For me, the word 'spandex' immediately conjures up images of the outrageous outfits worn by glam-metal bands of the 1980s. They needed those stretchy pants in order to do their high leg kicks on stage!
But truly, spandex has added a wonderful level of comfort to everyday attire and sportswear. Planning on bellying up to the buffet, or over-loading at family and holiday dinners? Spandex in shirts and pants is just what the doctor ordered.

The term 'spandex' (called elastane in other parts of the world) is an anagram of the word 'expands.' Of course, that's the primary trait of the fabric -- it 'expands.' You might also know the fabric as 'Lycra,' which is the most popular brand name of spandex.
Lycra, created by Du Pont scientist, Joseph C. Shivers in 1959, is a highly elastic synthetic fiber found to be stronger and more durable than rubber.
Always blended with other natural and man-made fibers such as cotton, wool, silk, and linen, Lycra and other brands of spandex are lighter in weight than rubber thread and won't break down with exposure to perspiration, lotions, or detergents.
Introduced to consumers in the 1960's, spandex was first found in soft-support pantyhose and intimate apparel. Next, after being added to men's and women's swimwear, it made it's Olympic debut in 1969, when the French ski team wore it for hitting the slopes. By the 1980s, spandex could be found in sporting attire, dance wear, and jeans. One of my favorite pop stars, Madonna, turned spandex innerwear into outerwear, setting off an enormous fashion trend.

The increase in spandex usage can be attributed to a variety of characteristics. The pliant fabric has the capability of stretching more than 500% over and over again, and never break or lose its shape. The smooth, wrinkle-free fabric won't pill, is abrasion-resistant, and is comfortable, while also offering support.
Today, DuPont continues to build on spandex research and development. Their efforts have been so impressive that they were actually a target of an internal extortion attempt. Employees stole the documents related to spandex, and demanded $10 million for its safe return. Spandex truly has an exciting history.
While I appreciate spandex for its comfort, embroidering on it can give even the most seasoned stitcher a rip-roaring headache. The following tips and tricks will help your spandex stitching become an instant success.
The biggest obstacle when planning to embroider on spandex is how much to stretch it. Take a piece of spandex and look at it in its relaxed state; now stretch it taut. If you stitch the design when the fabric is relaxed, then it'll be misshapen when the spandex is stretched. Conversely, if you stitch the design when the spandex is stretched taut, the spandex is going to pucker when the fabric is relaxed. Are you already running to the medicine cabinet for aspirin? No worries -- stick with me!
I've found that it's best to stretch the spandex so it's midway between a relaxed and a taut state. That, of course, can be adjusted depending on where you'll be placing the design. If you're placing the design in an area that will be stretched a lot, then stretch your spandex a little more before you stitch. If you're placing it an area that will be stretched a little, then stretch the spandex a little less.
Lisa's niece, Jaidyn, needed something special to wear to a pool party this past Father's Day weekend. Read on to see how I embroidered on her bathing suit.
Even though fabrics containing spandex endure little to no damage from "needle cutting," I used a ball-point needle. Ball-point needles have points that are more rounded than embroidery or sewing needles, so they'll push the fibers to the side when forming the stitches. When selecting a design, choose one that has open areas with simple fills. If you choose a complex design with layering, shading, or highlighting, chances are it'll be not only too heavy, but also get misshapen.
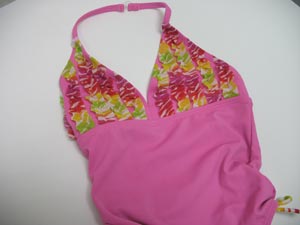
Here's Jaidyn's swimming suite -- cute, but it needs a little something extra. I chose the Princess design, perfect for a little girl.
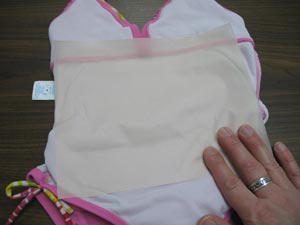
Because spandex is such a slippery fabric, I used a cutaway stabilizer. Floriani's No Show Mesh cutaway stabilizer (1.5 oz) is a great choice, as it hides well behind the sleek, form-fitting material. And, it's also very soft against the skin.
I turned the suit inside out, and sprayed the stabilizer with temporary adhesive. I like KK100, but any temporary spray adhesive will work fine. This helped to keep the slippery spandex and stabilizer together during the embroidery.
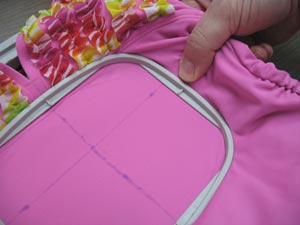
Hoop the fabric and stabilizer together, tightly. Pull gently on the fabric on the left and right sides of the design, pulling the fabric but not the stabilizer. The fabric will slide over the stabilizer when you pull it. Do your best to pull the fabric equally on the left and right sides. I did have to pull a little bit on the top and bottom, too, to straighten out the fabric.
Hand-tighten the screw on the hoop to hold the stretched fabric in place. Then, press down on the spandex so that it re-bonds with the adhesive and stabilizer again. Flatten out any puckered or dimpled fabric that you see, too.
If you're cringing because you've always been taught never, ever stretch or tweak the fabric after it's hooped, I know what you're thinking. When I was pulling the fabric in the hoop it went against every fiber of my being. But trust me -- it works for spandex.
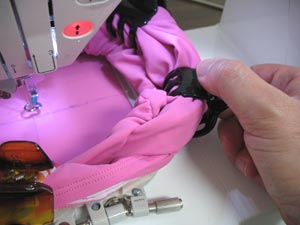
And then, everything else is just like normal. Roll the excess fabric out of the way, and embroider the design.
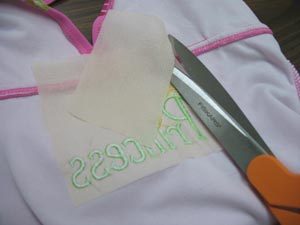
After the design has finished stitching, unhoop the garment and trim away the extra stabilizer on the back. Generally I leave about 1/2 inch of stabilizer around the back of the design, and that seems to work well with spandex, too.
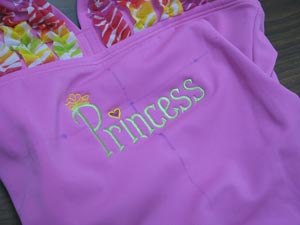
Here's the finished result. You can see that the spandex is puckering slightly around the design when its in a relaxed state.
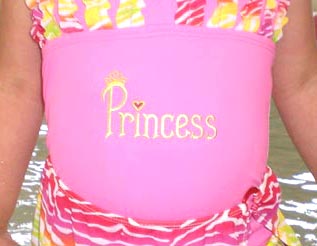
And that's fine, because when Jaidyn is wearing her swimming suit (right), the spandex stretches and the puckers disappear. Lisa reports that Jaidyn was the princess of the party, and wouldn't take off her new bathing suit.
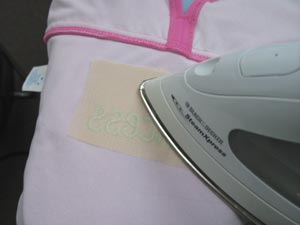
Optional: For further comfort, I decided to add a layer of stabilizer to the backside of the embroidery to cover the stitches and to make the garment softer against the skin. I used Floriani's No Show Mesh Fusible (an iron-on cutaway stabilizer) and ironed it onto the reverse side of the design. Careful of the temperature settings, as spandex has a low melting point.
Spandex is relatively easy to care for. Either machine wash in cool water, or hand wash in lukewarm water and rinse. Line drying is the preferred method, although if you want to machine dry, use a low temperature setting.
If you're ready for another tip, check this Stitchers Showcase entry. LeAnn was getting ready for a trip to Hawaii, and decided to add flowers to her basic black bathing suit. She did a fantastic job of stretching and plotting, and added a bit of prayer to make sure everything went okay.
A few more suggestions and techniques were submitted by Jean, a veteran of Lycra stitching who has made competitive figure skating dresses for over 12 years. She uses a needle made by Schmetz that is exclusively for stretch fabrics. It has a finer point than a ballpoint needle to go through the tighter weave of the Lycra. She likes to use cut away stabilizer and trims it fairly close to the material.
Also, to get an idea of exactly how much stretch to put in before embroidering, (especially when making skating dresses and swim suits) Jean takes the person's measurements and cuts the garment, taking out an 1/2 inch from the circumference and 1 inch from the girth. And, it is important to get the maximum stretch of the fabric going around the body rather than vertically so it drapes correctly. Even though most Lycra has a 4-way stretch, it still stretches more on the lengthwise grain.


