Designs Used
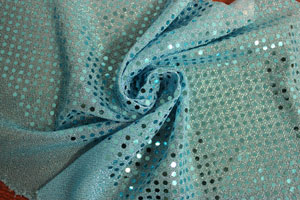
Confetti Dot fabric has always caught my eye in the fabric store. Among the fabrics, it's got the most shine and the most sparkle. It's a glittery and somewhat sheer knit fabric, and it comes in many colors, and the "dots" come in many sizes and shapes.
This type of fabric is often used for dancewear, skirts, wraps, and accessories like scarves and belts. You may know it from one of its many other names: dot lame, foil dot, sequined glazed mesh, reflecting knits, dot sequins, confetti sequins, or knit sequins.
The type of Confetti Dot fabric that I experimented with is a nylon and polyester blend. The sparkling dots themselves are usually made from plastic or Mylar, and are held to the fabric with a heat-reactant glue.
Confetti Dot fabric is lightweight and stretchy - great for late spring and summer ensembles. It's surprisingly sturdy for being such a light fabric.
Open and airy designs will work best on this type of fabric. If your heart is set on using a solid-filled design, choose a small one. That way the stitches won't be too heavy and cause the fabric to drape poorly.
When embroidering on this type of fabric, use a cutaway stabilizer. Cutaway stabilizer is the best choice when working with anything stretchy; tear-away or water-soluble stabilizer will usually cause registration issues (that's when sections of the design aren't placed where they should be).
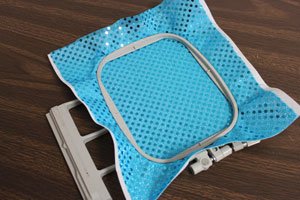
I wondered about hooping this fabric. Would hooping bend or damage the dots? I needn't be concerned. The dots are well-adhered to the fabric, and weren't scraped or bent when I hooped (and I was quite vigorous with my hooping for testing purposes!).
To prepare the fabric for embroidery, I cut a piece of cutaway stabilizer a bit larger than the hoop. Then, because the fabric is so stretchy, I sprayed the stabilizer with a bit of adhesive (I use KK100). I smoothed the fabric on top of the stabilizer.
Using spray adhesive between the stabilizer and fabric makes a nice tight bond when embroidering. As the hoop is moving around and about during embroidery, stretchy fabric fibers can become skewed, resulting in puckering or poor registration. Using spray adhesive will eliminate that problem.
I also took care when hooping, smoothing the fabric so that there were no bubbles or ripples in the fabric. The stretchier the fabric, the trickier it is to get it nice and smooth.
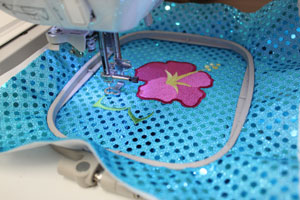
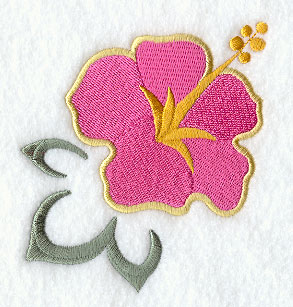
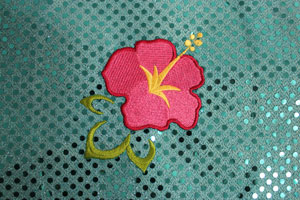
The first design that I stitched was the Art Deco Hibiscus design. You may remember my earlier comment that when using solid-filled designs, choosing a small one is best. A design like this is perfect for Confetti Dot; the filled areas are small enough that they won't negatively affect draping.
When embroidering on knits, I often use a ball-point needle. This type of needle will slide the fibers aside, whereas a sharp needle will cut the fabric fibers.
However, I need a sharp needle (75/11) to penetrate the "dots." Using a ball-point or embroidery needle resulted in some fuzzy stitches; a sharp needle works best.
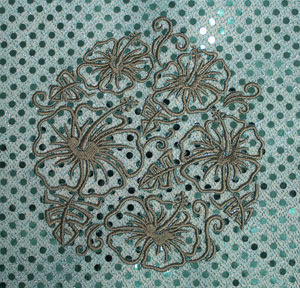
Because Confetti Dot is so bright and lively, it was tricky to pick the right colors for the design. I experimented with one-color designs, like this Simply Hibiscus Circle.
This example is tone-on-tone, which results in an understated look. The key for a good tone-on-tone effect is to choose a thread color that is slightly lighter, brighter, or darker than the fabric.
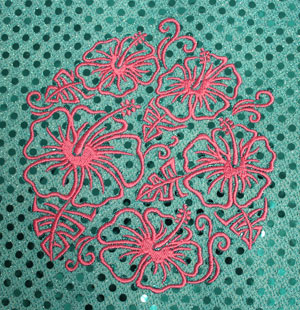
This example shows the same design in a bright and bold scheme, which contrasts with the Confetti Dot fabric color.
Color scheme is all about personal preference. You might love something, and someone else will think, "Hmm... not for me!"
Working with fabrics that have accents (like Confetti Dot), or prints, or even subtle woven patterns, can be a challenge for choosing the right colors. Choosing simpler designs will be a better balance for the "busy" fabric.
Because Confetti Dot is sheer and stretchy, a stiff-feeling cutaway may form ridges around the back side of the fabric. I've found that Floriani's No-Show Mesh or Sulky's Soft 'n Sheer do a nice job of "blending" with the fabric, leaving no or little visible ridge.
Before leaving the fabric store with your Confetti Dot, check the label on the bolt for laundering instructions. The label on the bolts that I used advised hand-washing separately; cold water, no bleach, line dry and lay flat. However, I've been known to "cheat." My version of "hand-washing" involves turning the garment inside out, putting it in a lingerie bag, and machine-washing it on a delicate or gentle setting.
The label on the bolt that I bought guarded against dry cleaning; the dry cleaning solution will cause the dots to become unglued from the fabric.
Don't attempt to iron Confetti Dot fabric. At best you'll lose a few dots; at worst you'll be shopping for a new iron.


