We all know that there are many factors involved in getting that perfect embroidery stitch out. Stabilizers appropriate to the fabric and design choice, embroidery threads and bobbin thread choices, needle sizes and types conducive to the fabric and design; all of these are important considerations. However, even if all these things are in place, the hooping method can mean the difference between the desired result and the one that makes us all sigh and say "gee.....what went wrong?"
Taking some time to learn proper hooping techniques can spare you a world of trouble later on, so let's look at ways we can improve your technique.
The first rule of hooping is to hoop on grain. This means you want to position the inner hoop so that the straight grain of the fabric runs in line with the vertical and/or horizontal markings of your hoop. If you twist the hoop so that the lower edge is off the grain for instance, your fabric will stretch as the stitching is laid down.

Using air erase marker and a long straight ruler (quilter's clear rulers work great for this), mark a vertical and horizontal line on the grain of the fabric.
Where the two lines meet is a great way to position designs, using a printed template you can match the center of the design to the center of the lines. In this particular instance I am hooping for a split design. Notice that the horizontal markings of my hoop are in line with the horizontal grain lines.
To facilitate positioning of the hoop on these lines, I have used strips of Wonder Tape on the inner wrong side of the hoop. In this way, when I press the inner hoop into position, the tape will prevent the inner hoop from moving when I insert it into the outer hoop.
The larger the hoop, the longer the sides. With our home embroidery machine hoops, these longer sides tend to pull away from the outer hoop as we tighten. To see this for yourself, grab a large hoop, lay it on a flat surface and begin tightening the screw. Pay special attention to the side furthest away from the screw. You'll notice that the long sides pull inward, away from the outer hoop, leaving a gap. When sewing on heavier fabrics, the fabric will take up the gap, but on lighter weight fabrics, this gap can cause your project to slip as the design stitches.
Even with a hoop with a center screw, these long sides tend to pull away from the outer hoop. It isn't any one brand - it's just the nature of physics!
Wonder Tape on the inner hoop really helps to prevent the fabric from slipping and in many cases is enough. You do not need to replace the Wonder Tape for each hooping; I find it lasts through about 6 hoopings, depending on the fabric. When it is no longer sticky enough to do its job, simply run your hoop under water to remove it. It's really great to have two hoops if you can manage it.
I use a product called Fusi-Batt on most of my Embroidery Library projects. The Fusi-Batt is quite tightly woven and has enough grip and stability that I find coupled with Wonder Tape gives me a good hooping. But there are times when I don't want the heavier batting behind my design, which leaves me with a bit of a quandary.
Joan Warr came up with an excellent idea for hooping lightweight fabrics, including water-soluble stabilizers that are either too thin or too slippery to be gripped tightly in the hoop. She uses rubber gripper that she attaches to the inner hoop with Wonder Tape. Rubber gripper can be purchased at Wal-Mart and just about any hardware store. It comes in a roll and its 'normal' use is for lining kitchen cupboards to prevent your dishes from slipping.
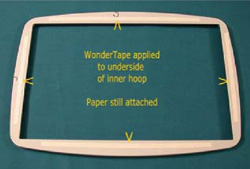
With kind permission from Joan, I'll discuss her method: In this first step, Joan applies Wonder Tape to the underside of her inner hoop, just like we would do if only using the Wonder Tape. In this photo Joan has not removed the paper from the Wonder Tape but you will want to do that so the gripper can be attached.
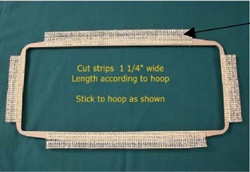
The gripper is cut into strips 1 1/4" wide, and placed on the Wonder Tape as shown. You want to avoid putting it on the corners, as the corners are tight enough. If you place it into the corners, it will defeat its purposes, and make the sides gape as before.
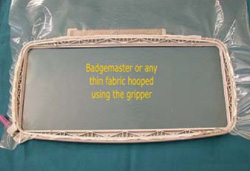
In this photo, the hooping is complete, with a water-soluble stabilizer. See how nice and tight the stabilizer is? And the really great thing is that it will not slip as the design stitches!
There are other methods that have been used over the years, including wrapping the hoop with a product called moleskin, available at most drug stores, as well as wrapping the hoop with gauze bandage, even bias tape.
Bull-dog clips are another method that has been used to hold the inner hoop's long sides to the outer hoop. The problem with this method is that there isn't a consistency to the sides. The area with the clip will be tighter, but the gape ends up somewhere else.
So while these other methods can help, I've found that they can be cumbersome and they don't have the gripping ability of Joan's method and the Wonder Tape methods.
Happy hooping!


