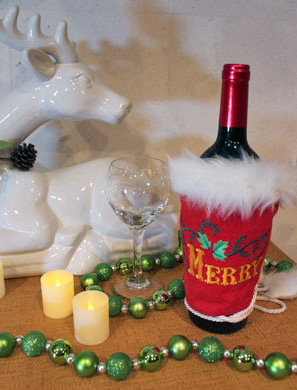
A bottle of wine makes an excellent gift for party hosts and friends. Present it in this delightfully festive wrap!
It's a fa-la-la fabulous way to wrap a gift. And, it's a fun way to dress up the bottles in your home, too.
Read below for these free project instructions!
Supplies
Supplies Needed:
**1/3 yard fabric (for the outer
shell and back - I used faux
suede)
**Medium weight cutaway
stabilizer
**Temporary spray adhesive
**Air-erase pen or
dressmaker's pencil (for
marking and placement)
Supplies Continued:
**4" wide by 20" long piece of faux fur trim
**Two - 23" lengths of decorative cord (mine is 1/8" thick)
**Needle and thread for some hand sewing
**Scotch tape
Designs Used:
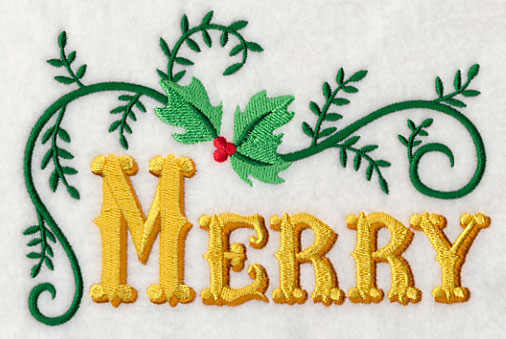
I used the medium size of the Classic Holiday Wishes - Merry and Holly (Miniature) for this project. Find the perfect designs for your bottle apron by visiting the Christmas category!
Special Project Notes:
The fur trim and pompoms are optional and can easily be left off. The ends of the cords, however, would need to be finished off with a knot so they will not fray.
Finished Size:
7" high (adjustable to fit a bottle up to 12" in circumference)
Designs Used
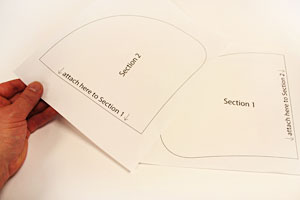
To get started, click here to open a .PDF file of the pattern pieces. There are two sections of the pattern that will print on two pieces of 8 1/2" wide by 11" high paper.
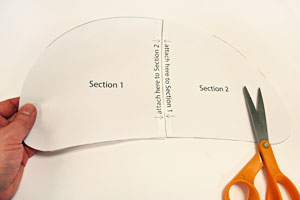
Cut out the pieces and tape them together following the instructions printed on the pattern.
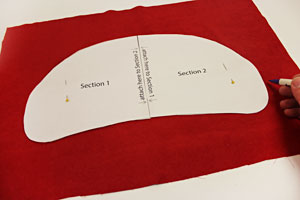
To prepare the outer shell of the wrap, lay the pattern piece on top of the fabric (I used faux suede) pin in place, and using an air-erase pen or other marking tool trace the shape.

Remove the pattern piece and create paper templates of the designs by printing them at full size using embroidery software. See these handy instructions for more information about making and using templates.
Place the templates within the shape. I centered the large design by measuring equal distances in between the center point of the template and the outer edges of the shape. I also placed the two small designs at each end of the shape leaving about one inch of space in between the outer edges of the designs and the outer edges of the shape. Poke holes in the center of the templates and mark the fabric. Then mark the horizontal and vertical axis points.
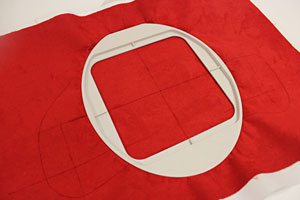
Remove the templates and draw lines connecting the marks. Spray a piece of medium weight cutaway stabilizer with adhesive and smooth the fabric on top. Hoop the fabric and stabilizer together by aligning the marks on the hoop with the lines on the fabric.
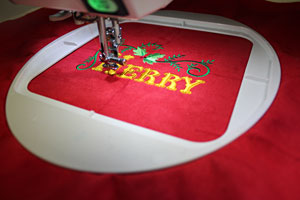
Attach the hoop to the machine and load the first design. Move the hoop so that the needle is directly over the center point on the fabric. Embroider the design. When the design has finished, repeat the hooping and embroidering process for the remaining designs.
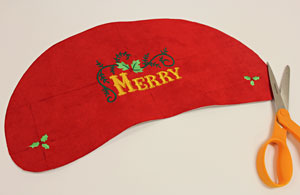
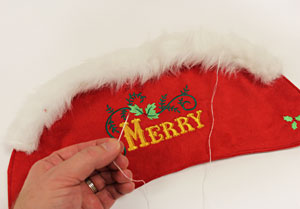
When all the designs have finished, cut out the shape. I left the stabilizer on the backside of the embroidery to help give the fabric more support.
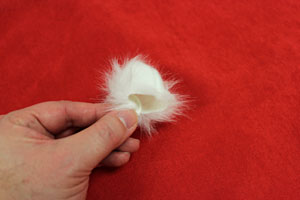
Now I will prepare the pompoms for the ends of the cords. Cut two pieces of the faux fur trim to 2" wide by 4" high. Fold the pieces, right sides together, so that the short ends meet. Pin in place and zigzag stitch along the side edges only. Turn the fur right side out.
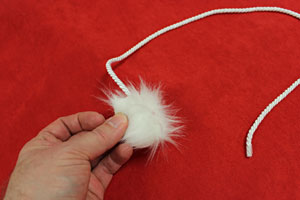
Cut two pieces of 1/8" thick decorative cord to 23" long. Insert one end of the cord into the pompom with about one inch of the cord tucked inside. Position the cord in the center of the opening. Pin in place and zigzag stitch along the open end of the pompom, stitching over the cord as you sew.
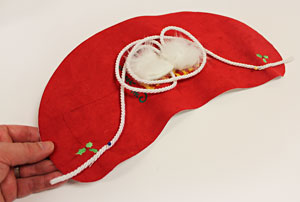
To add the cords, lay the embroidered outer shell flat with the right side facing up. Pin the raw ends of the cords at each end of the fabric with about 1/2" of the cord extending out past the outer edge of the fabric and about one inch up from the bottom edge of the shape. Wrap the opposite ends (pompom ends) together in the center of the fabric so it will not be sewn over later on.
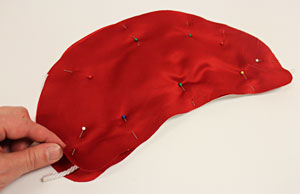
To prepare the back fabric, cut another piece of fabric using the pattern piece. Align the back fabric on top of the outer shell/cord portion, pin in place, and sew a 1/4" seam along the outer edges of the fabric leaving about 3 1/2" open along the top edge for turning.

Turn the fabric right side out, and using a pressing cloth and an iron set on a low setting, press the seams. Also, turn the fabric of the opening in 1/4" and press. Top stitch a 1/8" seam along the entire outer edge of the fabric.
To prepare the trim for the top of the wrap, cut a piece of the faux fur to 4" wide by 16" long. Fold the fur together with the long edges aligned. Pin in place and zigzag stitch along the raw long edge only - leave the short ends open. Turn the fur right side out and zigzag stitch the short ends closed.
With the seamed edge facing in, wrap the fur around the top edge of the wrap centering it side to side. Using needle and thread, sew the fur in place.
And your wine bottle wrap is complete!

To wrap it around a bottle, lay the wrap flat with the back side facing up. Lay the bottle in the center of the wrap.

Wrap it around the bottle, one side at a time, and hold it in place with one hand.
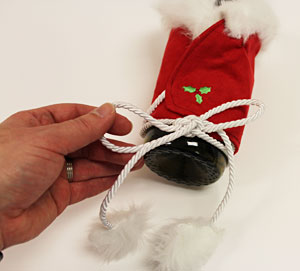
With your free hand, wrap the cords around the bottle from front to back, and tie the cords into a bow at the front of the bottle.


