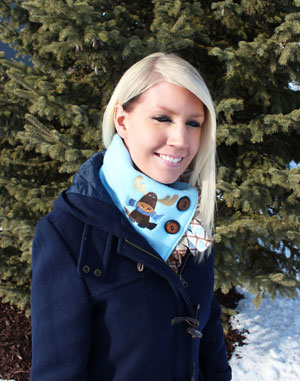
A stylish fleece button scarf is just the thing to stay warm -- and fashionable -- on the coldest of winter days.
Pick your favorite color fleece, two attractive buttons, and embellish with embroidery you love to create a winter accessory as unique as it is cozy.
Read on for instructions to make a soft fleece button scarf!
Supplies
Supplies Needed:
**1/3 yard fleece (for front and back)
**1/8 yard print fleece (for fringed trim)
**Medium weight cutaway stabilizer
**Temporary spray adhesive
**Air-erase pen
**Two large buttons (I used 1 3/16" buttons)
**Seam ripper
**Needle and thread for some hand sewing
Designs Used:
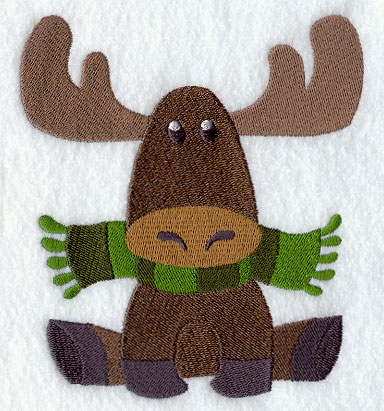
I used the small size of the Cozy Winter Wear Moose. Designs from Snowman Adventures and Wycinanki Snowflakes would also be great on a button scarf.
Finished Size:
Adult size: 24" wide by 10" high
Child size: 16" wide by 6 3/4" high
Special Project Notes:
I made the adult sized scarf. You can make a child sized scarf by cutting the fabric pieces using the measurements below:
Front and back pieces -- 16 1/2" wide by 7 1/4" high
Fringed trim piece -- 3" wide by 6 3/4" high
Then, follow the instructions below for the embroidery and the construction.
Designs Used
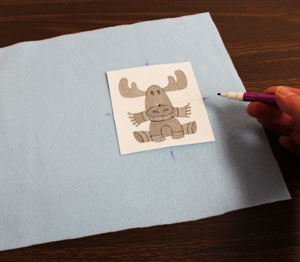
First, to prepare the front fabric, cut a piece of fleece to 25" wide by 11" high. Then, create a paper template of the design by printing it at full size using embroidery software. Place the template at the right end of the fabric.
I placed the design with the outer right edge about 3" from the outer right edge of the fabric. Center the design from top to bottom by measuring equal distances from the top and bottom outer edges of the design and the top and bottom edges of the fabric.
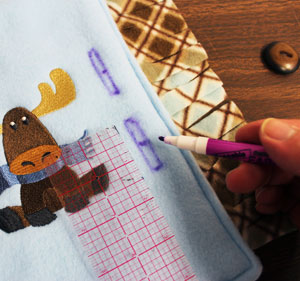
Using an air-erase pen or other marking tool, poke a hole in the center of the template and mark the fabric. Also, mark the horizontal and vertical axis points.
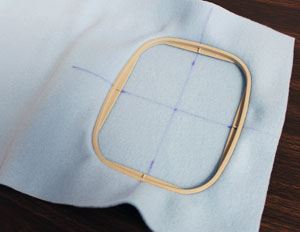
Remove the template and draw lines connecting the marks. Next, spray a piece of medium weight cutaway stabilizer with adhesive and smooth the fabric on top. Hoop the fabric and stabilizer together by aligning the marks on the hoop with the lines on the fabric. Attach the hoop to the machine and load the design. Move the hoop so that the needle is directly over the center point on the fabric. Embroider the design.
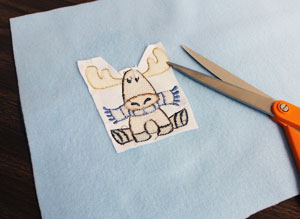
When the design has finished, trim away the excess stabilizer on the backside of the embroidery.
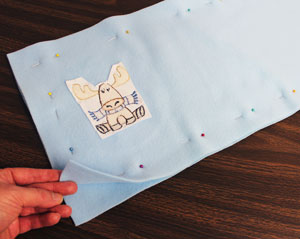
To prepare the back piece fabric, lay the embroidered front piece on top of the fabric, right sides together, pin in place, and cut out the shape. Sew a 1/2" seam along the top, bottom, and one of the short ends; leave one short end open for turning.
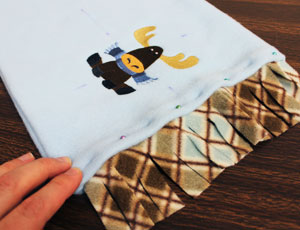
Clip the seam allowance at the two corners and turn the fabric right side out. To prepare the fringed trim, cut a piece of print fleece to 10" high by 3" wide.
Cut slits in the fabric along one of the long sides about every 1/2"; cut across the fabric widthwise stopping about one inch before reaching the other side. Insert the trim in between the front and back layers of the scarf with about one inch of the trim tucked inside (fringe side facing out). Turn the fabric of the opening in 1/2", pin in place, and sew a 1/4" seam around the entire outer edge of the scarf.
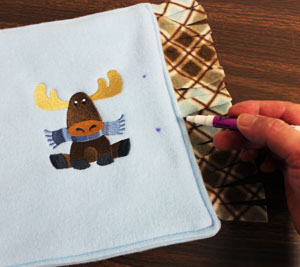
To add the button holes (adult sized scarf), make the following marks along the right end of the scarf (just to the right of the design): measure and mark 3 1/2" down along the right edge and one inch in from the right edge. Measure and mark 2" down from the mark you just made.
Child sized scarf: make the following marks along the right end of the scarf (just to the right of the design): measure and mark 2 3/8" down along the right edge and one inch in from the right edge. Then, measure and mark 1 3/8" down from the mark you just made.
Next, draw rectangles around the marks (with the marks in the center) about 1/4" higher than the button's diameter and 1/4" wide. My buttons are 1 3/16" in diameter, so, I drew my buttonholes to about 1 3/8" high by 1/4" wide.
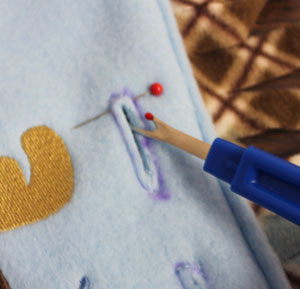
Sew a double seam around each rectangle. Add a pin at the top of each rectangle and using a seam ripper, open the button hole starting at the bottom (the pin will prevent cutting too far up).
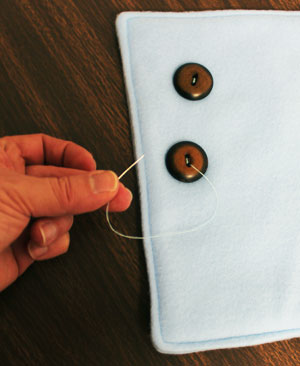
To add the buttons (adult sized scarf), on the left end of the scarf (opposite end from the design) measure and mark 2" down along the left side and 2" in. Then, measure 4" down along the left side and one inch in. Sew the buttons in place at each of the marks.
Child sized scarf: on the left end of the scarf (opposite end from the design) measure and mark 1 3/8" down along the left side and 1 3/8" in. Measure 2 5/8" down along the left side and 5/8" in. Sew the buttons in place at each of the marks.

To wear the scarf, fold the top edge over about one inch (to the wrong side), wrap the scarf around your neck, and button it in place!


