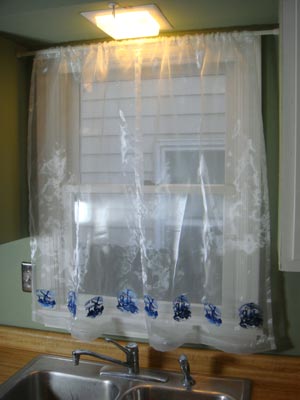
It's quick and easy to add a new look to a window in your home. Organdy, a lightweight and sheer fabric similar to organza, is a wonderful canvas for embroidery designs.
These instructions show you how to measure your window and calculate the amount of fabric and position your favorite embroidery designs. In just a few lickety-stitches you'll have a new look in any room in your home!
Read below for these free project instructions.
Supplies
Supplies Needed:
**1 1/2 yards of 50 inch wide fabric (measurements will vary depending on the window)
**Heavy-weight water-soluble stabilizer (Sulky Ultra Solvy)
**Temporary spray adhesive
**Air-erase pen (or other marking tool)
**Curtain rod, sized for window
Designs used:
A Delft Blue Classics Design Pack - Sm (also available in a large and medium size)
There are many different types of embroidery designs that would look stunning on these organdy curtains. To stitch on organdy with water-soluble stabilizer as backing, choose light designs. Consider vintage flowers, Redwork, toile, Bluework, and similar light, simple stitch designs.
Fabric and Stabilizer Choices:
We used organdy for this project, which is a sheer fabric similar to organza. Because we're using organdy and light designs, we're able to use water-soluble stabilizer as a backing. If you use a different type of fabric, different stabilizer may
be required. Refer to the Fabric and Stabilizer matching guide to choose the right stabilizer for your fabric.
Measuring Your Window:
To begin, measure the window. Measure the width from the outer edge of the
window frame to the outer edge of the opposite side. Then, measure the distance
from the curtain rod to the bottom edge of the frame.
The window we are working with is 33 1/2 inches wide by 40 1/2 inches high. We're making two panels for the window.
We'll take the window width and divide by two (that equals 16 3/4 inches). Then, we'll take that measurement and multiply by 1.5. That adds width to each panel so we can gather them at the top. 16 3/4 inches multiplied by 1.5 is (approximately) 25 inches.
Then we'll add two inches to the width to allow for side seam allowances. That brings our width up to 27 inches per panel.
Next, take the height measurement and add 7 inches. This is the allowance for the top pocket area and the bottom hem, which are both 3 1/2 inches. Our height measurement is 40 1/2 inches, so the total height we need is 47 1/2 inches.
Whew! Now that the math is done, we're ready to make curtains!
Designs Used

Cut two pieces of the fabric to your dimensions (we're cutting ours 27 inches wide by 47 1/2 inches high.
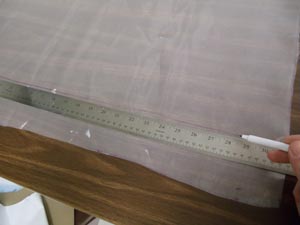
Lay the fabric pieces flat. Using an air-erase pen (or other marking method), mark 3 1/2 inches up from both bottom corners along each side. Then, draw a line across the fabric connecting the marks.
Measure and mark 3 1/2 inches down from both top corners along each side, and draw a line connecting the marks. The area above the top line is the allowance for the top pocket area. The area below the bottom line is the allowance for the hem.
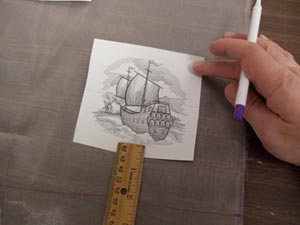
Create paper templates of the designs by printing them at full size using an embroidery software program. If you'd like a recommendation for an embroidery program that can make templates, consider Embird from www.Embird.com.
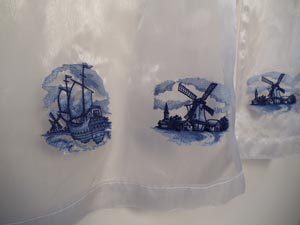
Arrange the designs as you wish. We're repeating two designs along the bottom of the curtains, four designs on each panel.
We placed the designs with the bottom edges about 1 1/2 inches from the bottom line. We placed the first design with the outer edge about 2 1/2 inches from the outer right edge of the fabric. Then we measured the distance between the bottom line and the center point on the design (4 inches with the design that we'll be embroidering).
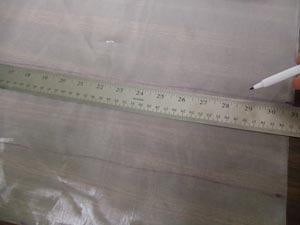
Then we measured and marked 4 inches up from the bottom line along the right edge of the fabric. We then measured and marked 4 inches up from the bottom line along the left edge of the fabric.
Then we drew a line connecting the marks, and this line is the baseline for all of the designs.
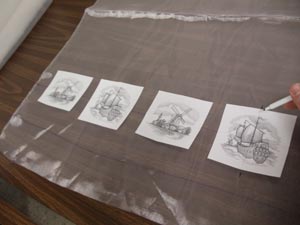
Poke holes in the centers of the templates and align them along the base line. We spaced the designs about 2 inches apart from one another; this measurement will vary depending on the size of your curtain panel, designs, and your personal preference.
Mark the vertical axis points. Remove the templates and draw lines connecting the axis points. These lines will be used for hooping.
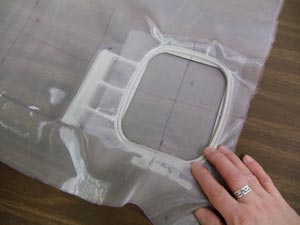
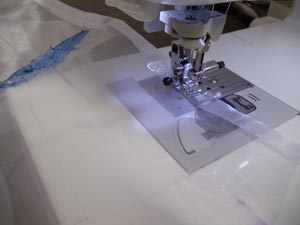
Spray a piece of heavy weight water-soluble stabilizer with a quick shot of temporary spray adhesive, and smooth the fabric on top. Hoop the fabric and stabilizer together by aligning the marks on the hoop with the lines on the fabric.
Attach the hoop to the machine and load the first design. Move the hoop so that the needle is over the center point of the fabric.
We want the curtain to be reversible, so we've wound a bobbin with the same thread that we're using in the top. Embroider the design, and continue to wind a bobbin for each color in the design.
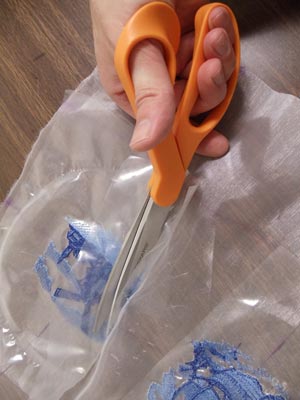
When the design has finished, trim the excess stabilizer and any long threads on the backside of the embroidery.
Repeat the hooping and embroidery process for each of the designs.
When you have finished stitching all of the designs, fold the side edges over 1/2 inch to the wrong side and press (we've set the iron on a low setting to avoid melting the fabric).
Fold the side edge over again 1/2 inch to the wrong side, and press.
Sew a seam along the inner edge of the folds.
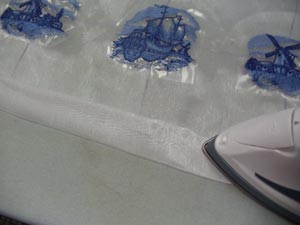
Next, fold the top and bottom edges over 1/2 inch to the wrong side and press. Then, fold the top and bottom edges over 1 1/2 inches to the wrong side and press. Sew a seam along the inner edge of the folds. This creates a top pocket for the curtain rod, and the bottom hem.
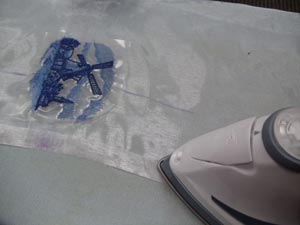
Next, to remove the stabilizer and marking lines, we washed the curtains on a delicate setting using mild soap and cold water. We allowed them to air dry, and then pressed the backside of the embroidery with an iron set on a low setting.
A wonderful way to dress up any window in your home!


