Any theme and any size! Clocks nowadays come in all shapes and sizes, and now you can make them from any embroidery design!
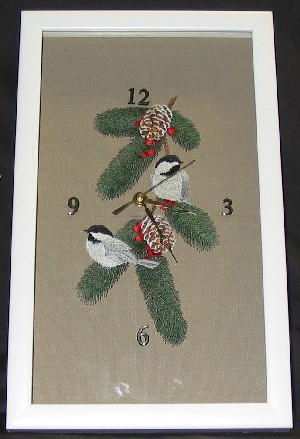
Chickadees are such a joy to watch as they hop along my deck rail, or fly back and forth between the pine trees and the feeder.
Captured in thread, these happy little chickadees will mark the hours in this timepiece on the wall near my bay window or in my three-season porch.
Supplies
Supplies needed:
-
Art or photo frame slightly larger than the dimensions of your embroidery design
-
A piece of woven fabric that is several inches larger than your frame
-
Clock movement, hands, and numbers
-
Picture hangers or eye screws
-
Wire or non-stretch cording
-
Acid free mat board ─ enough to cut 2 backing pieces for your frame.
Tools needed:
-
Staple gun with 1/2" long staples
-
Hobby knife
-
Metal-edged ruler
-
2 binder clips
Embroidery Designs:
Winter Chickadees
Make a clock for all seasons. Scroll down to see Seasonal Birds perfect for your clock project.
Designs Used
Embroider the design on the piece of woven fabric that is several inches larger than your frame
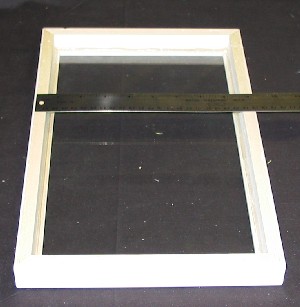
Take the backing piece out of the frame. My frame had the picture and backing simply stapled to the back of the frame, so I had to remove everything to be able to put something new into it. You may be able to salvage the backing from your frame if it has an easily removable backing.
Measure the width and length of your frame, and subtract 1/4" from each measurement. These will be the measure-ments for the backing pieces. My measurements were
9" by 15".
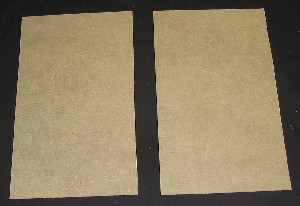
With your hobby knife, cut 2 pieces of mat board to the measured dimensions of the frame.

If the frame is deep enough to accommodate the shaft of the clock movement, you may want to leave the glass in the frame. If the frame is not deep enough to accommodate the shaft, remove the glass from the frame.
Place the empty frame over the sewn out design, and center the design within the frame. To ensure that the design is centered, measure the distance from the frame to the closest portion of the design, and adjust until the distances are equal from side to side and top to bottom.
Use a disappearing marking pen to mark a line around the outer perimeter of the frame. I also made marks to determine the center of the image within the frame, and then decided that I didn't want to put the clock movement in that spot because I would have to cut through my stitches and I preferred not to do that. By placing the shaft up and slightly to the left of center, it seemed to work better with this particular design. By taking the whole composition into consideration, I marked where I wanted to make the 3/8" hole for the clock movement.
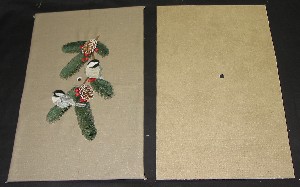
Place the embroidered fabric over one of the backing pieces, and smooth it over the surface and around the back of the edges while lining up your marked lines with the edges of the mat board. You may want to use an acid-free spray adhesive to keep the fabric from slipping on the back board. The fabric should be wrinkle free and taut, but not stretched.
When the fabric is where you want it, cut the hole for the clock movement through the fabric and backing with your hobby knife. Transfer the hole marking to the second board and cut the hole in that board as well.

Place the fabric-covered board and the backing board wrong sides together, matching the holes and making sure that the 4 sides are flush with one another. Use binder clips to hold the boards in together and in place.
Place the shaft of the clock movement through the hole, to check the fit, then glue or use foam tape to secure the movement in place on the back of the board. Place the hands on the movement according to the package directions.

To place the numbers on the face of the clock, make lines out from the movement hole both vertically and horizontally. Then mark for each number along each line. I placed my top and bottom numbers so that they are an equal distance from the edge of the frame (the 3 and the 9 are 1" inside the frame; the 12 and 6 are 2" in). If you want to add additional numbers, divide the four quad-rants into three equal (30�) triangles. The dividing lines between the triangles will be the lines on which to place the other numbers.
You'll notice that the numbers aren't all the same distance from the center of the clock. It doesn't matter how far away the numbers are from the center as long as they are centered on their appropriate line. I found that the numbers are easier to see when they are positioned on solid fabric.
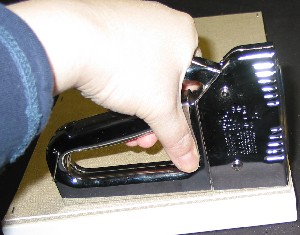
Remove the clips, and without moving the boards out of place, lay them face down into the back of the frame. Use the staple gun to secure the backing boards to the frame. The staples went through both layers of mat board with ease.
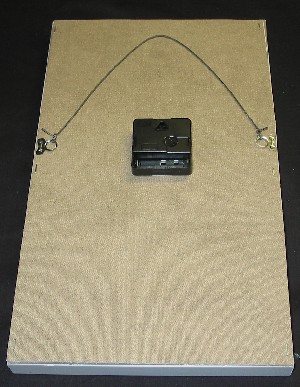
Attach the hangers to each side of the frame in the top half. Tie the cord between the hangers, so that the frame can be hung from a nail on the wall.
Now that you have your own personal chickadees on your wall, take some time to fill your feeders. A profusion of birds will benefit from a good meal and I even find myself smiling at the small animals that come to forage for the seeds that the birds knock to the ground.


