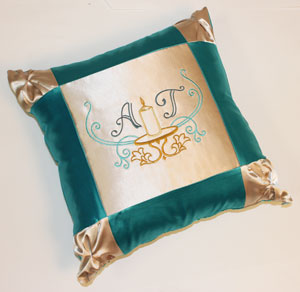
Fancy and fabulous, the pintuck pillow will add lasting beauty to any setting. With embroidery designs you choose, it will be a terrific personalized gift, or a home decor item that reflects your style!
Read on for instructions to make one of your own!
Supplies
Supplies Needed:
**18" by 18" pillow form
**3/8 yard fabric (for front panels and corner squares -- I used crepe-back satin)
**5/8 yard fabric (for side panels and back -- I used crepe-back satin)
**11" by 11" piece of polyester batting
**Medium weight cutaway stabilizer
**Temporary spray adhesive
**Air-erase pen or dressmaker's pencil
**18" zipper (I used a 100% polyester invisible zipper)
Designs used:
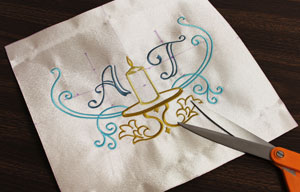
I used the 8.74"x5.86" size of the Unity Candle design, and stitched letters from the 2 inch height size of the Formal Affair Alphabet. Choose from our other monogram accent designs to find a truly personal look!
Designs from the To Have and To Hold Damask Design Pack or from the Wedding Day Whimsy Design Pack would also be lovely on the pintuck pillow.
Finished size:
18" wide by 18" high
Designs Used

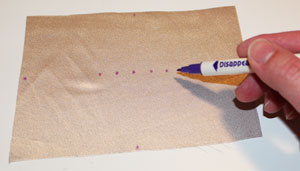
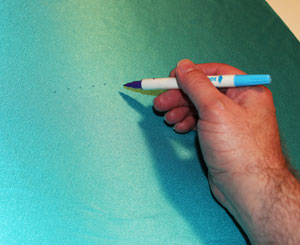
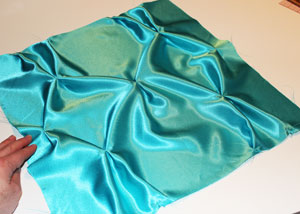
First, I prepared the fabric for the front square panel. Using an air-erase pen, draw an 11" by 11" square on the fabric (I used crepe-back satin). Leave a couple of inches of excess fabric around the outer edges of the shape.
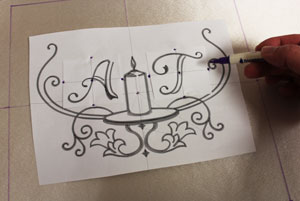
Measure and mark the center of each side of the shape by measuring and dividing by two. Draw lines connecting the marks; where the lines meet is the exact center of the shape. Create a paper template of the design by printing it at full size using embroidery software.
Poke a hole in the center of the template and align it with the center point on the fabric. There should be at least one inch of space between the outer edges of the design and the edges of the shape.
I embroidered the Unity Candle design with the Formal Affair Alphabet incorporated inside. Click here to see how to combine and embroider these designs. Also, click here for more information on embroidering on satin.
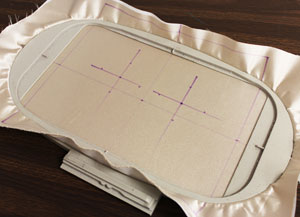
Spray a piece of medium weight cutaway stabilizer with temporary adhesive and smooth the fabric on top. Hoop the fabric and stabilizer together by aligning the marks on the hoop with the lines on the fabric.
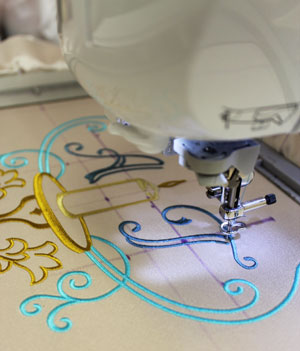
Attach the hoop to the machine and load the design. Move the hoop so that the needle is directly over the center point on the fabric. Embroider the design.
After the design has finished, trim away the excess stabilizer on the backside of the embroidery, and cut out the shape. Spray the backside of the fabric with adhesive, smooth it on top of the batting, and cut around the shape (the batting helps to smooth out the satin fabric).
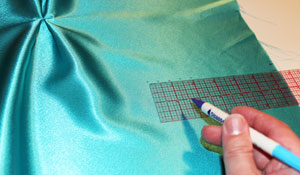
Next, to prepare the fabric for the corner squares, cut four pieces of fabric (I used crepe-back satin) to 7" wide by 5" high. Measure and mark the center of the right and left side by measuring and dividing by two. Then, measure and mark the center of the shape by measuring in between the two marks and dividing by two.
Next, measure and mark 1/2" out from the center mark on each side. Measure and mark out 1/2" again on each side out from the marks you just made.
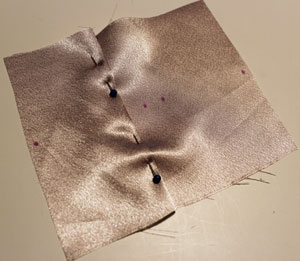
Pinch and fold the fabric at the outer left mark and bring it in to meet the center mark (the fabric should fold at the middle mark). Pin in place.

Pinch and fold the fabric at the outer right mark and bring it in to meet the center mark. Pin in place. Tack the folds in place by sewing a 1/2" long seam along the top of the folds along the center mark.
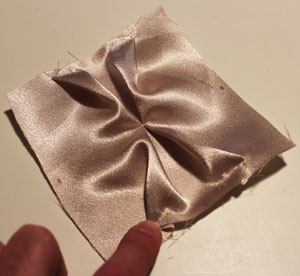
At the outer points of the "x" shape created by the center pintuck, fold the fabric over 1/2" (towards the outer edges of the fabric) at the top and bottom edges. Tack the folds in place with a 1/4" seam along the outer edges of the fabric. Repeat this process for each of the four corner fabric pieces.
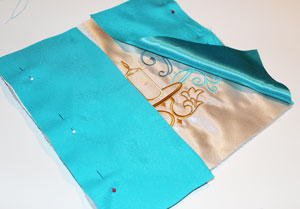
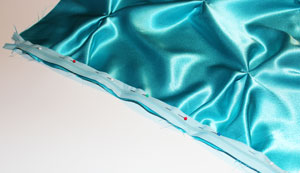
To prepare the fabric for the side panels, cut four pieces of fabric to 5" wide by 11" high. Lay the embroidered front square flat with the right sides facing up. Align two of the side panels with the left and right side of the square, right sides together, pin in place, and sew a 1/2" seam along the pinned edges only. Using a pressing cloth and an iron set on a low setting, press the back seams open.

Lay the remaining two side panels flat with the right sides facing up. Align the corner squares on top aligned with each short end, right sides together, pin in place, and sew a 1/2" seam along the pinned edges only. Press the seams.
Lay the center square/side panel piece flat with the right sides facing up. Align the side panel/corner square pieces on top aligned with the top and bottom edges of the fabric. Align the seams, pin in place, and tack at each seam with a few stitches first, then sew a 1/2" seam along the pinned edges. Press the seams.
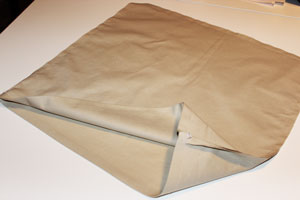
To prepare the back fabric piece, cut a piece of fabric to 23" wide by 19" high. Mark the center of the fabric just as you did for the corner squares. Pintuck the center of the fabric just as you did earlier.
Next, I will add four more pintucks to the back fabric. To do this, measure and mark 5" up along the left and right sides starting from each corner.
Measure 5 1/2" inside the fabric starting at each mark along the sides. Then, on each mark, measure and mark 1/2" out along each side. Measure and mark out 1/2" again from the marks you just made.
Pintuck the fabric at each set of marks. Also, fold the fabric over 1/2" towards the outer edge of the fabric about 2" in along the left and right side at the center of fabric (aligns with the first pintuck in the center). Pin in place and tack in place with a few stitches.
To add the zipper, align the zipper with the bottom edge of the back fabric, right sides together. Pin in place and using a zipper foot on the machine, sew a seam along the bottom edge of the zipper sewing as close to the teeth as possible.

Flip the zipper over right side facing up and align the front panel on top of the zipper and back fabric, right sides together. Pin the front fabric and zipper together along the bottom edge and sew a seam along the open side of the zipper as close to the teeth as possible.
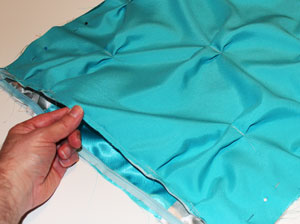
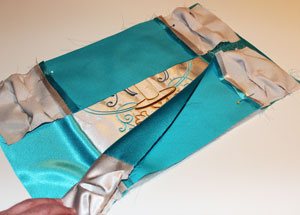
Unzip the zipper and align the front and back pieces together, right sides together, pin in place and sew a 1/2" seam along the left, right, and top edges only. Turn the fabric right side out. The outer shell portion is now complete.
To prepare the inner lining, cut two pieces of fabric (I used Kona cotton) to 19" wide by 19" high. Align the pieces together, right sides together, pin in place, and sew a 1/2" seam along the right, left, and top edges only. Leave the bottom edge open. Fold the fabric of the bottom opening 1/2" to the wrong side and press.
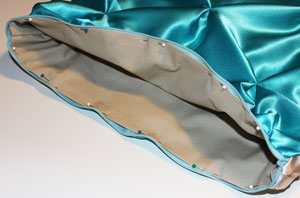
Insert the inner lining inside the outer shell. Flip the raw edges of the zipper over to the inside of the outer shell and align the folded edges of the inner lining just under the teeth of the zipper. Pin in place and sew a 1/8" seam along the folded edge of the inner lining. Insert the pillow form inside, zip it up, and you are done!

The pintuck pillow, with its gathers and lines, is beautiful from the back, too!


