Charm your neighbors and your postal carrier with this sensational and simple mail box cover. Magnets keep the cover snugly in place, even on the most blustery of days.
Supplies
Supplies needed:
-
30" of 1/2" wide magnet tape.
-
8 ct. package of round ceramic magnets (3/4" diameter)
-
1 package of wide single-fold bias tape
-
5/8 yard heavy-weight nylon fabric.
Embroidery Design from Embroidery Library:
Designs Used
Instructions:
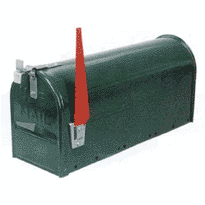
Measure your mailbox and make a note of the following:
-
Length from front to back, not including the edge where the front door fits over the body of the box.
-
From the bottom of the flag side of the box, over the top, to the bottom of the opposite side of the box.
-
From the bottom of the box to the bottom of the flag when it is down.
-
From the bottom of the flag to the top of the flag when it is down.
-
From the edge of the closed cover to the front edge of the flag when it is up.
-
From the edge of the closed cover to the front edge of the flag when it is down.
For the Flag Opening
Using measurements 1 and 2, mark out a rectangle. Measurement 1 will be the bottom edges of the cover and measurement 2 will be the front and back edges of the cover. Add 1/2" (for seam allowances) to each of the four sides.
Use measurements 3, 4, and 6 to make the vertical line for the flag insertion. This will allow the flag to rest comfortably in the "down" position.
Measurement 3 tells you where to start the line, and measurement 4 tells you where to stop. Measurement 6 tells you how far the line should be from the front edge of the cover. Remember to take into account the seam allowances that you added to each edge of the fabric.
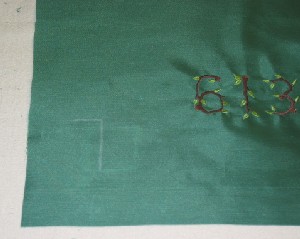
Use measurement 5 to mark a horizontal line starting at the top of the vertical line, which will allow the flag to comfortably stand in the "up" position. Measurement 5 tells where to stop marking. Remember to take into account the seam allowances that you added to each edge of the fabric.
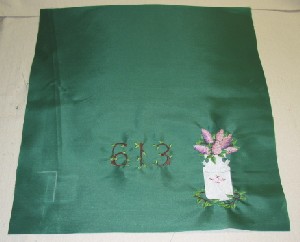
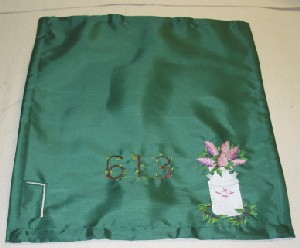
Place and embroider your designs onto the fabric. I placed the lilacs so that they will be just behind the flag in the down position and the numbers are just above where the flag sits. Cut out the marked rectangle.
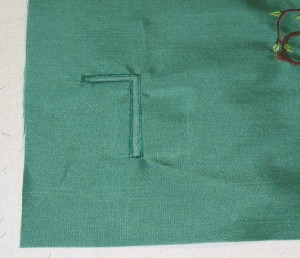
Use a narrow satin stitch to sew around your markings. The stitching should look like two button holes that make an upside-down "L".
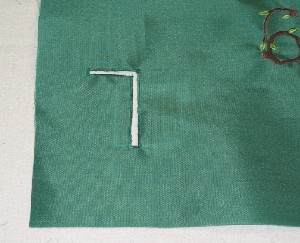
Open up the fabric between your lines of stitching as you would a button hole. Melt the nylon fabric between the stitches with a stencil cutter or soldering iron to fuse the fibers together and create a no-fray edge.
Preparing the Cover
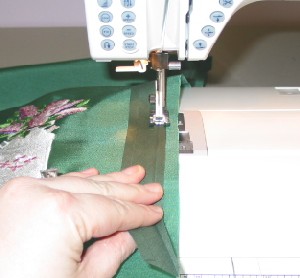
On the front and back edges, create a casing for the magnet tape by using the bias tape. Open one folded edge of the tape and place the right side of the tape on the right side of the fabric edge. The crease of the bias tape should be 1/2" from the edge of the fabric. Straight stitch in the crease for the entire length of the front and back edges.
Flip the tape to the wrong side of the fabric, and stitch the edge of the tape down to form the casing. Trim off any extra tape from the end.
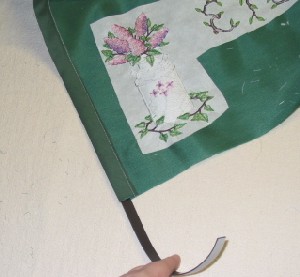
Cut the magnet tape in half and feed it into the casing in the front and back of the cover.

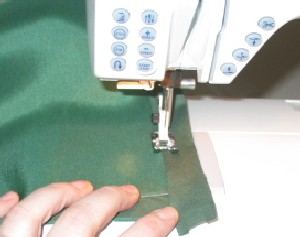
In the same manner as the front and back casing, make casings for the bottom edges on each side.
The only difference here is that you need to leave 1/2" of bias at the end of each side to turn under. This will finish the ends of the tape off, neatly.
You will put the round magnets in these casings, spacing them equally along the casing. I used a small dowel to push them in as far as I wanted them. I found they fit snugly, and the bias tape stretched just enough to fit around them Stitch between the magnets to keep them in place.
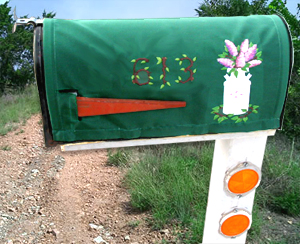
Place the cover on your mailbox by slipping the flag through the slot first, then adjusting the rest of the cover over the mailbox and securing into place.


