
A homespun rag quilt apron is a fun apron for the holidays, and other occasions, too. Add Christmas designs or other designs you love for a look that's unique and tailored to any holiday or season. With so many squares, it's a great showcase for embroidery and beautiful fabric.
The soft flannel and frayed edges give the rag quilt apron a warm, handcrafted look. It's even got two handy pockets. And, it will keep your clothes clean while you whip up tasty treats in the kitchen!
Read on for free project instructions to make a rag quilt apron for Christmas -- or any time!
Supplies
Supplies Needed:
**1/4 yard cotton fabric (for embroidered blocks; I used flannel)
**1/2 yard cotton fabric (for back of blocks; I used flannel)
**1/4 yard solid colored cotton fabric (for pockets; I used twill)
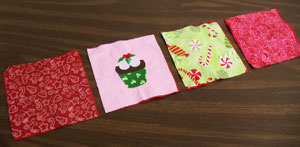
**Nine 6 1/2" wide by 6 1/2" high pieces of print cotton fabric (for blocks; I used three different prints)
**Medium weight cutaway stabilizer
**Temporary spray adhesive
**Air-erase pen
**2 3/4 yards (about 100") length of 1 1/2" wide ribbon (I used grosgrain ribbon)
**Rag quilt snips (optional)
Designs Used:
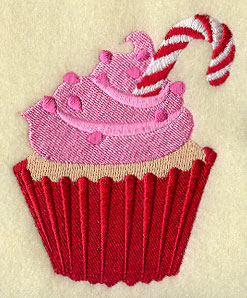
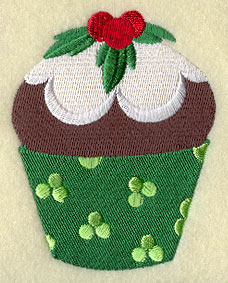
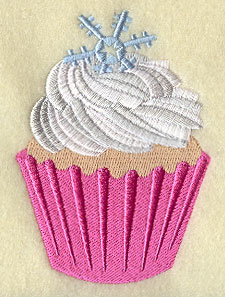
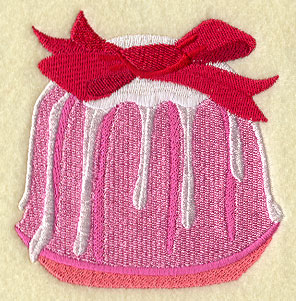
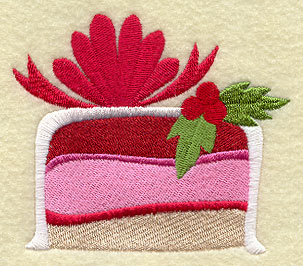
I used the Candy Cane Cupcake, the Holly Cupcake, the Snowflake Cupcake, and the large sizes of the Christmas Petit Four and the Holiday Bundt Cake.
Beary & Bright Bakers and Dash of Christmas Cheer designs would also be fun on a rag quilt apron.
Finished Size: 22" wide by 17" high
Special Project Notes:
Be sure to pre-wash all fabrics to pre-shrink them.
Designs Used

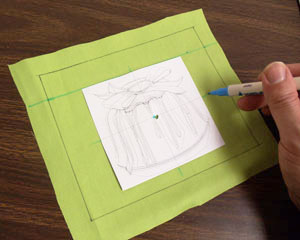
First, to prepare the embroidered blocks, cut a piece of cotton fabric (I used flannel) to 6 1/2" wide by 6 1/2" high. Using an air-erase pen or other marking tool, measure and mark the center of each side by measuring and dividing by two. Draw lines connecting the marks.
Create a paper template of the design by printing it at full size using embroidery software. Poke a hole in the center of the template and align it with the center point on the fabric. Make sure the design fits well within the shape. There should be at least one inch of space between the outer edges of the design and the edges of the shape.
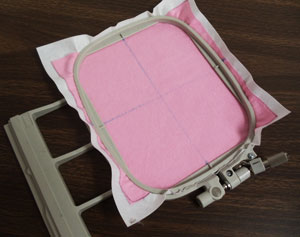
Remove the template. Spray a piece of medium weight cutaway stabilizer with temporary adhesive and smooth the fabric on top. Hoop the fabric and stabilizer together by aligning the marks on the hoop with the lines on the fabric. Attach the hoop to the machine and load the design. Move the hoop so that the needle is directly over the center point on the fabric. Embroider the design.
When the design has finished, trim away the excess stabilizer on the backside of the embroidery. Repeat this process for a total of three embroidered blocks.
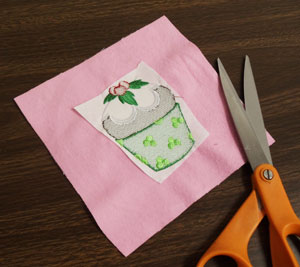
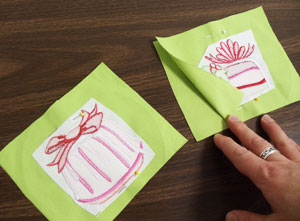
To prepare the pockets, draw a 6 1/2" wide by 5 1/2" high rectangle on the solid colored cotton fabric (I used twill). Leave a couple of inches of excess around the shape for hooping. Measure and mark one inch down along each side starting at each top corner. Draw a line connecting the marks; the area below this line is the embroidered area. Create a paper template of the design and position it within the shape. The top edge of the design can touch the line you just drew.
I centered the design side to side by measuring equal distances between the edges of the design and the side edges of the shape. Also, make sure there is at least one inch of space between the bottom edge of the design and the bottom edge of the shape. Poke a hole in the center of the template and mark the fabric. Also, mark the horizontal and vertical axis points.
Remove the template and draw lines connecting the marks. Hoop the fabric with cutaway stabilizer that has been sprayed with temporary adhesive, and embroider the design just as you did earlier. Repeat this process for a total of two pockets.
To prepare the back pocket fabric, cut two pieces of fabric to 6 1/2" wide by 5 1/2" high. Align the fabric on top of the embroidered pieces, right sides together, pin in place, and sew a seam along the top edges only. Press the seams, fold the layers together, wrong sides together, and press the top seam. Top stitch a 1/4" seam along the top edges only.
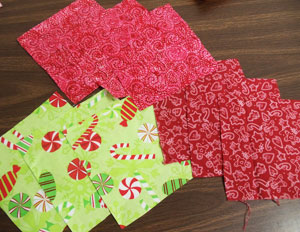
Next, cut nine pieces of print cotton to 6 1/2" wide by 6 1/2" high (I used three different prints).
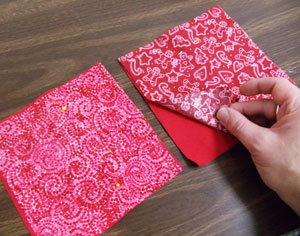
To prepare the backs of the blocks, cut twelve 6 1/2" wide by 6 1/2" high pieces of the cotton fabric (I used flannel). Align the print fabric and embroidered blocks with the back fabric pieces, wrong sides together, and pin in place. All of the pairs of blocks will be quilted together. Thread your machine with monofilament thread. I am using this transparent thread because I want the block to be quilted together, but I do not want the top thread to show.
In the same respect, wind a bobbin with cotton thread that matches the color of the back fabric. Quilt the blocks as desired (free motion embroidery). I chose to quilt with a simple "X," sewing from corner to corner. Always sew with the top block facing up so that the monofilament will be on top, and the colored bobbin on the bottom.
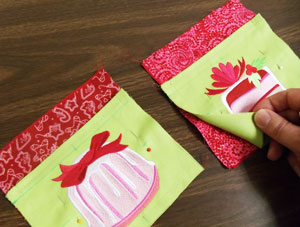
To finish the pocket blocks, lay two of the assembled print blocks with the right sides facing up. Align the pockets on top with the bottom edges aligned. Pin in place and sew a 1/2" seam along the side and bottom edges only.
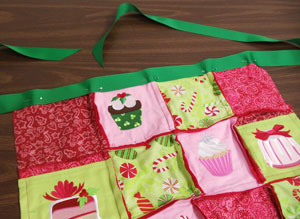
Now that all the blocks are ready, it is time to assemble the apron! Arrange the top row of blocks how you want them. Align the blocks together, one at a time, wrong sides together, pin in place, and sew a 1/2" seam along the pinned edges only.
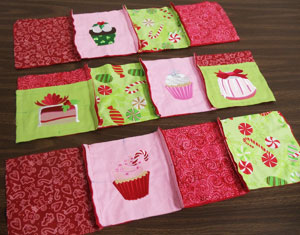
Repeat this process for the middle and bottom row (I placed the pocket blocks at the ends of the middle row). Once the three rows are complete, align them together, wrong sides together, align the seams, and sew a 1/2" seam along the pinned edges only. Also, sew a 1/2" seam along the entire outer edge of the apron. Sew around the shape twice to strengthen the seam.
Next, cut a

Clip the seam allowances, which allows the fabric to fray. Make a small cut about every 1/2" along all of the seam allowances including the outer edge. Be careful not to cut any of the seams. If you do accidentally cut a seam, simply sew it back in on your machine. I prefer to use sharp, spring action scissors to cut the allowances. It makes it much easier on your hard-working hands! There are special rag quilt snips available on the market. Fiskars, for example, manufactures the special shears. They can be found at most fabric or craft stores.
Lastly, machine wash the apron. The agitation will fray the seams, giving a fuzzy and cozy look. After washing the apron, take it outside and give it a good shake. This will lessen some of the lint and fabric waste that will end up in your dryer. Next, machine dry the apron. If necessary, press the apron with an iron set on a high setting; use a pressing cloth over the embroidered blocks to prevent scorching. And your rag quilt apron is complete!
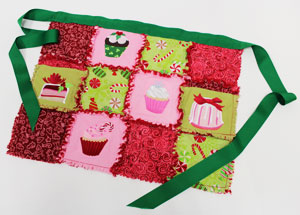
Pick your favorite fabrics and embroidery designs to make your own festive rag quilt apron. They make great gifts, too!


