Stunning satin fabrics, a beautiful decorative flower, and an elegant Asian design give this unique handbag a sophisticated appeal!
This fashionable purse is the perfect solution for your everyday needs. Not only is the embroidered bag polished enough to be a chic option for evening events, but it's a stylish choice for everyday wear as well.
Learn how to make the fashion-forward embroidered handbag -- simply read on for step-by-step instructions.
Supplies
Supplies Needed:
**1/2 yard solid-color crepe back satin (for outer shell)
**1 yard print brocade fabric (for insert)
**5/8 yard print brocade fabric (for inner lining and handle)
**1/4 yard solid-color crepe back satin (for decorative flower)
Supplies Continued:
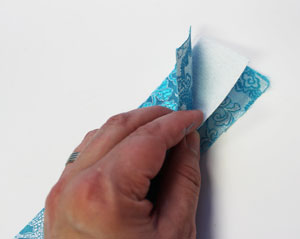
**1 yard stiff double-sided fusible interfacing (I used medium weight interfacing)
**Temporary spray adhesive
**Medium weight cutaway stabilizer
**Air-erase pen or dressmaker's pencil (for marking and placement)
**6 yards total extra-wide double-fold bias tape (I used two different colors -- 3 yards each)
**One large button (for decorative flower -- mine is 1 1/2")
**Needle and thread for hand sewing
**Fabric glue or hot glue and gun
Design Used:
For the satin handbag, I used the medium size of the Asian Watercolor Koi Fish design. Find the perfect design for your bag by visiting the Japanese Art department.
Finished Size:
8 1/4" wide by 17" high by 6 1/2" deep
Designs Used
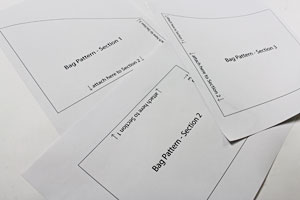
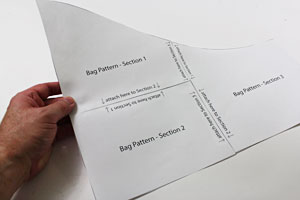
To get started, click the link above to open a PDF of the handbag pattern. Print the pattern -- there are three pieces of the pattern that will print on three pieces of 8 1/2" by 11" size computer paper.
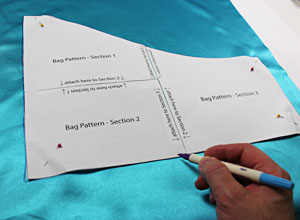
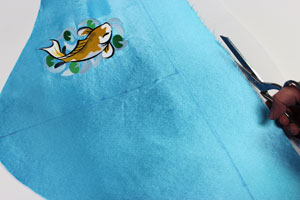
Prepare the fabric for the outer shell of the bag. Lay the solid-color fabric flat with the right side facing up. Pin the pattern in the upper right corner of the fabric (leaving 4" of excess fabric underneath). Use a marking tool to trace the pattern.
Remove the pattern and flip it over with the wrong side facing up (mirroring the pattern you've just traced). Align the long right edge of the pattern with the long left edge of the traced shape. Pin the pattern in place and trace the shape.
Remove the pattern piece. To allow for the bottom of the bag, draw 3 1/2" lines below the traced shape starting at each bottom corner (extend the outer side edges down), then draw a line connecting the ends of those lines.

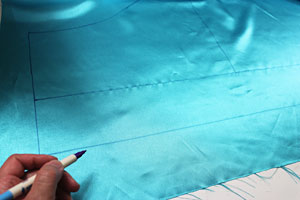
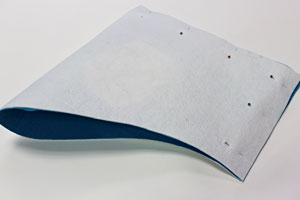
Create a paper template of the design by printing it at full size using embroidery software. Place the template inside the right side of the shape where you want it. I placed the template so that the left edge of the design is about 3" in from the center traced line in the shape and the top edge of the design is about 2" down from the top edge of the shape. Poke a hole in the center of the template and mark the fabric. Also, mark the horizontal and vertical axis points
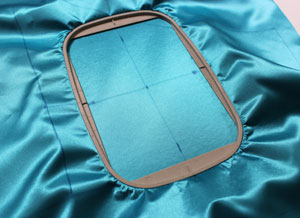
Remove the template and draw lines connecting the shapes. Spray a piece of medium weight cutaway stabilizer with temporary adhesive and smooth the fabric on top. Hoop the fabric and stabilizer together by aligning the marks on the hoop with the lines on the fabric.
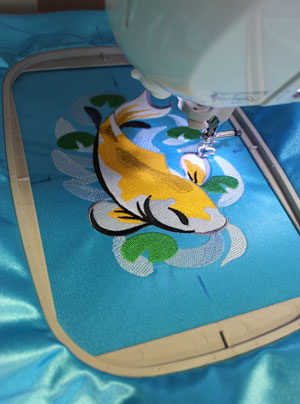
Attach the hoop to the machine and load the design. Move the hoop so that the needle is directly over the center point on the fabric. Embroider the design.
When the design has finished, trim away the excess stabilizer on the backside of the embroidery. Cut out the fabric along the outer lines. Add the embroidered front piece on top of the stiff interfacing (leaving a bit of excess around the outer edges of the fabric) and press with an iron.
Be sure to use a pressing cloth on top of the satin to activate the interfacing (without a pressing cloth the fabric will melt) and to follow the instructions on the interfacing packaging. After pressing, trim the excess interfacing away.
Assemble the outer shell by folding the right sides of the fabric together with the short ends aligned. Pin in place and sew a 1/2" seam along the short end and the bottom edge only (the bottom edge is the long straight edge).
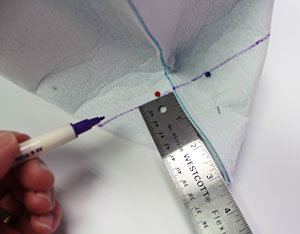
Trim away the seam allowance leaving about 1/4" behind. Square off the bottom corners of the bag -- on the seamed side, align the side seam with the bottom seam and pin in place. Measure and mark 3 1/4" in from the outer point and then draw a line across the corner perpendicular with the seam. Sew a seam along this line.
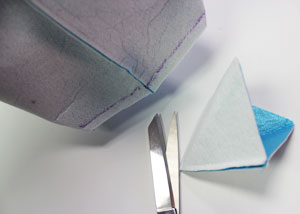
Trim the corner along the seam leaving 1/4" excess. Repeat this process for the opposite side of the outer shell -- there is no seam on this side, so with the outer shell sitting straight up, align the side with the bottom (eyeballing it so that it is straight). Square off this side just as you did the other. Turn the outer shell right side out.
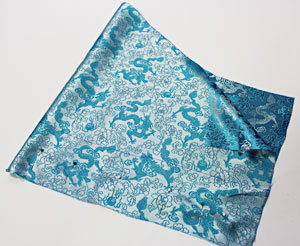
To prepare the inner lining, use the pattern piece to mark and cut the fabric (I used brocade) just as you did the outer shell including adding the 3 1/2" bottom allowance. Assemble the inner lining just as you did for the outer shell.
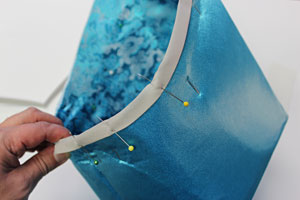
Insert the inner lining inside the outer shell, wrong sides together, aligning the seams and top edges together. Pin in place and using a pressing cloth, activate the interfacing along just the top edge of the inner lining (inside the bag). Add bias tape along the entire top edge of the outer shell; pin the tape in place and sew a seam along the inner edge of the tape.
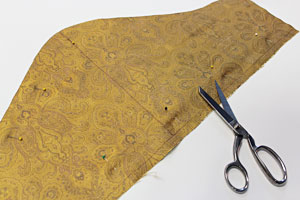
To prepare the insert, use the pattern piece to cut two pieces of the brocade fabric -- mark the fabric as you did for the previous pieces but this time add 1/2" under the shape (instead of 3 1/2"). Align the pieces together, right sides together, pin in place, and sew a 1/2" seam along the side and bottom edges only (leave the curved top edge open).
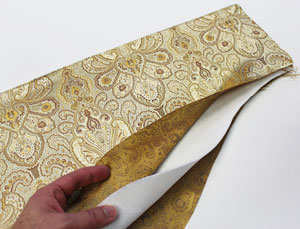
Turn the fabric right side out and using a pressing cloth, press the seams. Lay the fabric piece on top of the stiff interfacing, trace the shape, and cut out the shape. Insert the stiff interfacing in-between the fabric layers -- you may need to trim down the interfacing along the side and bottom edges a bit until it lays flat inside. Using a pressing cloth, press the fabric on both sides to activate the interfacing.
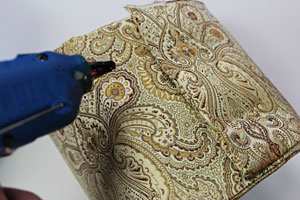
Overlap the short ends over each other about 2". Add hot glue or fabric glue in between the layers and press in place. Add bias tape along the entire top edge of the insert just as you did for the outer shell.

Add the insert inside the outer shell with the tall side of the insert facing out to the side. Using needle and thread, tack all four corners of the insert to the bottom corner of the outer shell.
To create the handle, cut two pieces of brocade fabric and one piece of stiff interfacing to 2" wide by 25" long. Layer the pieces together: lay one piece of brocade flat with the wrong side facing up. Align the interfacing on top then align the remaining piece of brocade on top of the interfacing with the right side facing up (wrong sides of the brocade facing towards the interfacing). Press with a pressing cloth to activate the interfacing. Add bias tape to the long side edges of the handle.
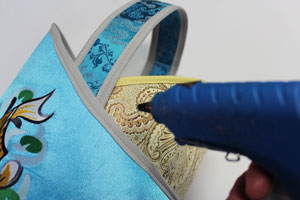
To attach the handle, add glue to both sides of each end of the handle, and insert the ends in-between the layers of the bag (the outer shell and insert layers). Be sure the ends of the handle are inserted about one inch, and press in place.
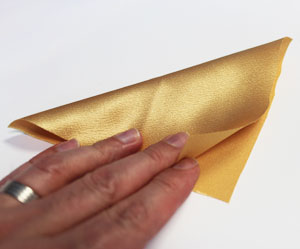
To prepare the decorative flower, first create the petals. Cut a piece of satin to 5" wide by 5" high. Fold the fabric together corner to corner, wrong sides together.
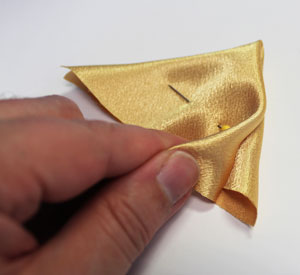
Fold the fabric again corner to corner and pin in place. Sew a 1/8" seam along the single folded side only.
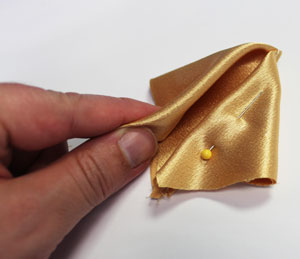
Open the fabric up and then bring the top corners down to meet the bottom point. Pin in place and sew a 1/8" seam along the raw bottom edges only.

Flip the fabric over, bring the bottom edges together to meet at the center seam and glue in place.
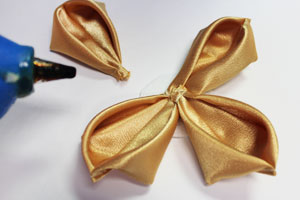
Repeat this process for each petal (I made four total petals for my flower). Cut a small piece of interfacing to about 2" by 2" and trim off the corners. Glue the raw ends of the petals in place in the center of the piece of interfacing.
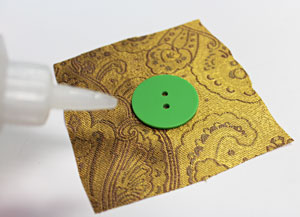
To prepare the flower center, cut a piece of brocade to about 3" wide by 3" high. Glue a large button (back side facing up) on the center back of the fabric. Trim the fabric around the button leaving about 1/2" excess. Add glue to the back of the button and press the fabric in place working your way around the button.
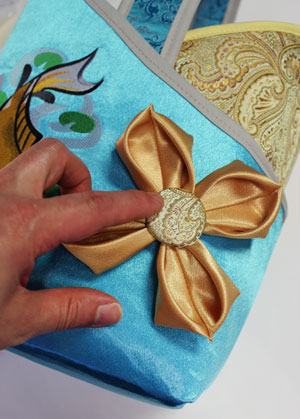
Glue the flower center in place on the flower. Trim away any excess interfacing that might show in-between the petals. Glue the flower in place onto the bag and voila!
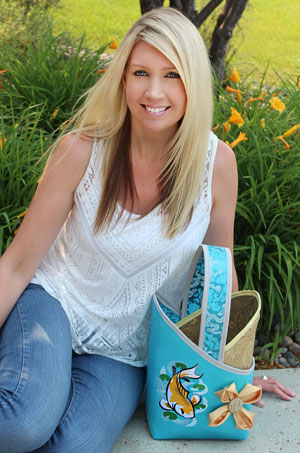
The bright colors and elegant fabric used in this purse gives it a unique, sophisticated look that's sure to catch envious eyes!