FREE Snowman with $5 order PLUS Double Reward Points! Click the deals tab for details.❄️
 FREE Snowman with $5 order PLUS Double Reward Points! Click the deals tab for details.
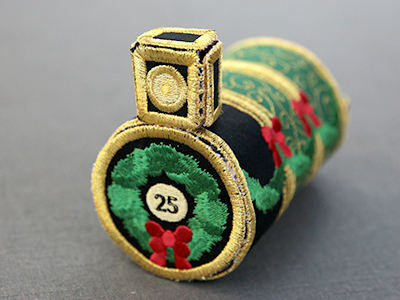
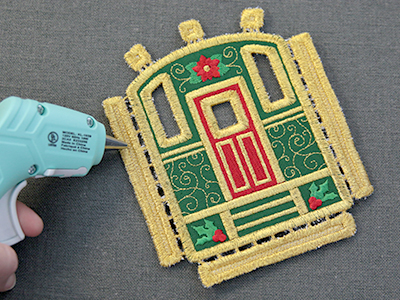
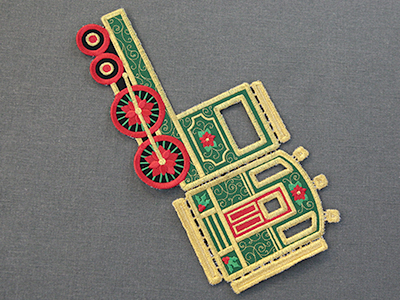
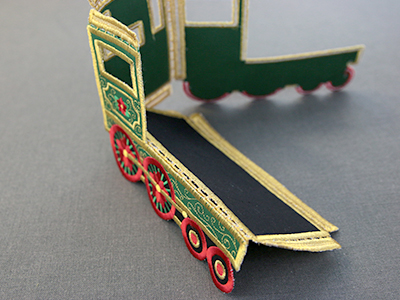
All aboard the Christmas train! Craft a holiday classic with this gorgeous machine embroidery design. Stitch each embroidered fabric piece separately, then fold and glue to build your own colorful train engine. Step-by-step instructions below will show you how!
Supplies
Project Needs & Notes:
- 1/2 yard quilters cotton, flannel, or similar fabric (for main color)
- 1/2 yard quilters cotton, flannel, or similar fabric (for accent color)
- 1/4 yard quilters cotton, flannel, or similar fabric (for roof)
- Temporary spray adhesive (such as Gunold KK100)
- Tear-away stabilizer
- Medium weight cutaway stabilizer
- Embroidery thread
- Scissors
- Craft knife
- Cutting mat
- Ruler
- Hot glue gun and glue sticks
- Hand sewing needle (if preferred for assembly)
- Pipe cleaner
- Polyester fiberfill
- Wire cutter
- Tweezers
- Narrow stick for gluing (can be a thin wooden stick of paintbrush handle)
Designs featured in this tutorial include:
- X15004, Christmas Train Engine in 3D (In-the-Hoop)
Finished size:
Large size (X15004): 9 1/2" long x 3 7/8" wide x 7 1/4" tall
Small size (X15005): 7" long x 2 7/8" wide x 5 3/4" tall
Designs Used
This design has been specially digitized for tear-away stabilizer. After the stabilizer is removed, beautiful fabric and embroidery remain.

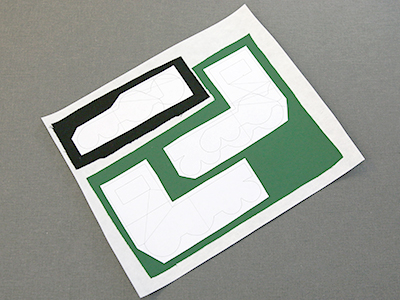
When you download the train engine design, you will find multiple files. Some are the embroidery files, and the others are dieline files marked with the letters "DL". Dielines are used to cut the fabric to the correct shape and size.
Open and print each dieline file using an embroidery software. If you do not have an embroidery software, Wilcom TrueSizer is a free program to use.

First spray one side of a piece of cutaway stabilizer with temporary adhesive. Smooth the stabilizer onto the wrong side of the fabric piece.
Then spray the back side of the printed dieline pieces with temporary adhesive, and smooth them onto the right side of the fabric. For this design, every fabric piece (the front, back, and accent panels) for every file needs to have cutaway stabilizer on them.
Cut the dieline shapes out of the adhered fabric and cutaway stabilizer. Some of the fabric pieces have openings that need to be cut with a craft knife. Cut out each of the openings using a craft knife and cutting mat. Then remove the paper dielines.
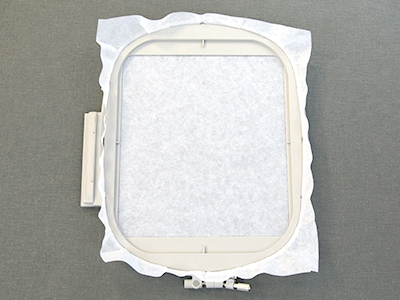
Hoop a piece of tear-away stabilizer firmly. Make sure it is nice and tight with no wrinkles.

Attach the hoop onto the machine, and load the first embroidery file (not the dieline files).
Use a 75/11 sharp sewing needle instead of an embroidery needle. The sharp sewing needle has a finer point, and it will make smaller perforations in the stabilizer.
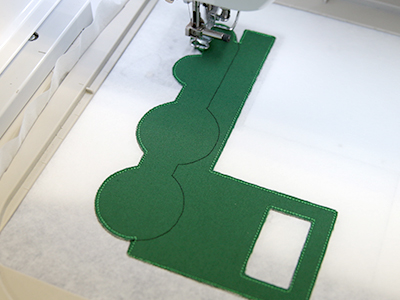
Embroider the design. The first thing to embroider will be the "front piece dieline" (or outline stitch). This marks the area on the stabilizer where the fabric piece will be placed.

After the dieline has sewn, remove the hoop from the machine, but do not unhoop the stabilizer.
Spray the stabilizer side of the front fabric piece with temporary adhesive.
Smooth the fabric piece onto the stabilizer inside of the sewn dieline.

Place the hoop back onto the machine, and embroider the tackdown for the front fabric piece. The tackdown will hold the fabric piece in place for the remainder of the design.
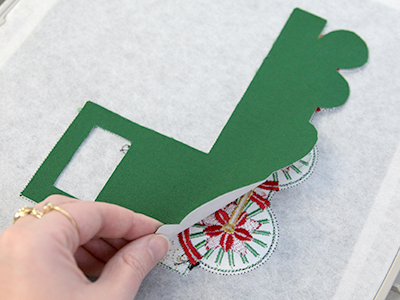
Some pieces have a panel of fabric in an accent color as well.
For these fabric pieces, embroider the "panel dieline" on top of the first fabric piece.

Spray the stabilizer side of the panel fabric piece, and smooth it in place inside the sewn dieline.

Then embroider the "panel tackdown" to adhere the fabric piece to the stabilizer.

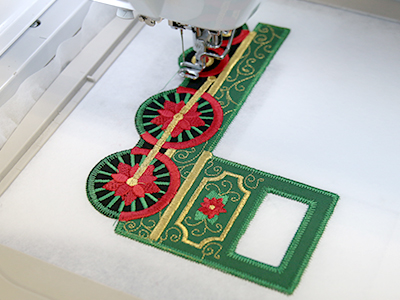
After all the fabric pieces are in place, all of the inner details of the embroidery will sew out.
Stop before sewing the "back piece tackdown."
Before sewing the "back piece tackdown" step, remove the hoop from the machine, and turn it over so the back side of the embroidery is facing up.
Spray the stabilizer of the back fabric piece with temporary adhesive, and smooth it into place on the back side of the embroidery.
Then place the hoop back onto the machine, and embroider the "back piece tackdown."
This will adhere the back piece in place on the back side of the hooped stabilizer.
For this design, you only need to match bobbins if desired. The bobbin sides of the pieces will not be easily visible once the train engine is assembled.

Follow the color change sheet to embroider the remaining tabs and finishing borders.
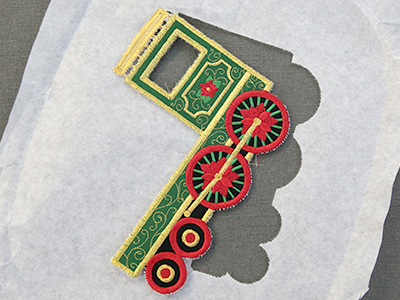
After embroidering, tear away the excess stabilizer. Also make sure to remove the stabilizer from all the window openings.

Many of the pieces also have small openings between the fabric pieces and the embroidered tabs.
Use a small pair of scissors or tweezers to remove the small pieces of stabilizer from these small areas.
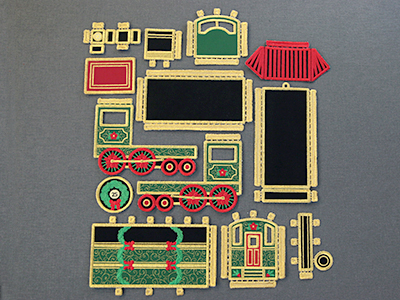
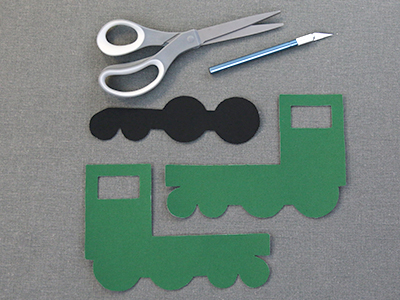
Repeat these steps to embroider all 13 the pieces of the train engine (files "a"-"m").
Make sure to place cutaway stabilizer on the back of every fabric piece, as it will make the train engine pieces sturdy enough to hold themselves up when completed.
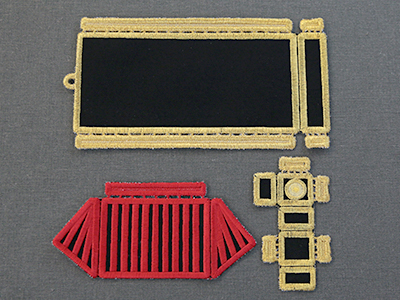
Some pieces have fabric folds where the fabric piece continues over the different sides of one piece.
This leaves a small channel of fabric between two sewn satin lines where the pieces will be folded. The headlight ("c") has four folds, the bottom base piece ("k") has one fold, and the front pilot ("m") has two folds.

In this tutorial, the train engine is designed to use glue and embroidered glue tabs for assembly. If preferred, you can also hand sew all the pieces together in the same order as listed below. Simply use thread matching the embroidery.

To make gluing the train engine together as easy as possible, glue tabs have been added to the file, and embroider out with the rest of the design.
These tabs are either long rectangles or small squares depending on if the edge is meant to be curved or straight in the end.

To use these tabs, simply place a generous amount of glue on the tab. For best results, glue long tabs in small sections, so the glue goes not dry faster than you can line up the pieces. Also glue small tabs one at a time, so the glue does not dry out too fast.

Then place the glue tab, with glue on it, against the wrong side of the adjacent edge or fabric piece where it will not be seen.

To begin assembly, first take the main boiler piece (file "a"). Place glue on the one long tab.

Then match the side with the long tab up to the opposite short side, making the boiler into a cylinder. Glue the tab onto the wrong side of the fabric piece, matching up the satin finishing borders perfectly. Hold in place until glue completely dries.

Next locate the front opening of the boiler piece (the opening that has 6 small, glue tabs). Fold all the tabs in. Place glue onto the small tab closest to the bottom, glued seam.
Then take the boiler front piece (file "b"), and match the bottom center (between the tails of the bow) up with the glued seam.
Press the glued tab to the back of the front boiler piece and hold it until the glue has dried.

Matching up the edges of the two pieces, repeat to glue all six of the small tabs to the back of the front piece one by one.
Use your gluing stick to push on the back of the tabs once you can no longer fit your fingers inside.

Next take the headlight piece (file "c"), and fold it along all four fabric folds. Make sure to fold it with wrong sides together. Press these folds with your fingers to make them crisp.

Then place glue on the side glue tab (next to the sewn light).

Glue the tab onto the wrong side of the adjacent edge, making the headlight piece into a box with the top and bottom still open.

To close the top, place glue on the top glue tab. The top opening has a glue tab next to a fabric fold piece, while the bottom opening has two glue tabs.
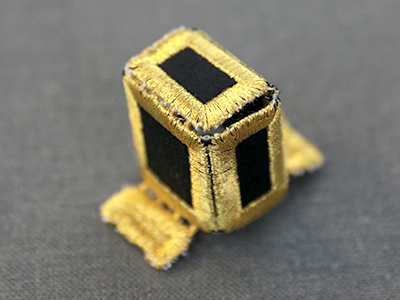
Then glue that tab onto the back side of the remaining folded fabric piece to close the top of the headlight.

Fold the bottom two glue tabs in, and place glue on the front tab.
Position the headlight on top of the boiler, so it is perfectly at the front top edge by the front boiler piece (file "b"). The top is opposite the glued seam. Hold the first tab in place until dry. Then repeat to glue down the second tab.

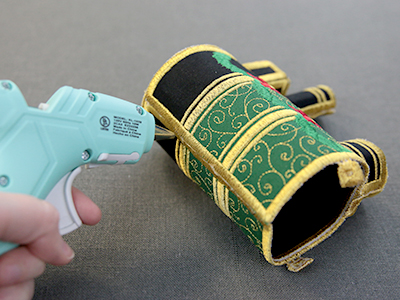
Next take the smoke stack piece (file "d") and place glue along the long glue tab.
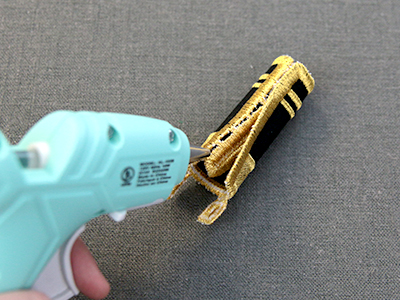
Just like with the boiler piece, match the glue tab side up with the opposite side to make the piece into a cylinder. Insert your gluing stick to hold the tab into place until the glue dries.

The bottom opening has two glue tabs. Fold one tab in, and place glue onto that one tab only.
Glue that tab onto the back side of the remaining tab. To do this, simply fold the second tab on top of the other so the glue is sandwiched between them. Use your gluing stick to hold them and press them together from the inside.

Then place a generous amount of glue onto the glued together tabs.

Glue the smoke stack in place directly behind the headlight ("c") on the top side of the boiler ("a"). The smoke stack should be touching the headlight, and the long, glued seam should be facing the open end of the boiler.

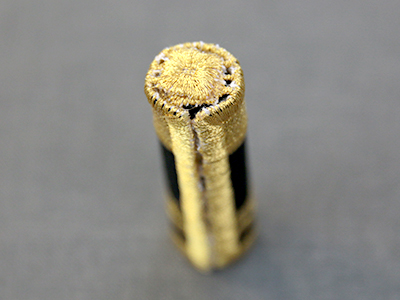
Next take the dome (file "e"), and place glue on the largest tab.

Again make the shape into a cylinder by gluing the glue tab side to the opposite side.
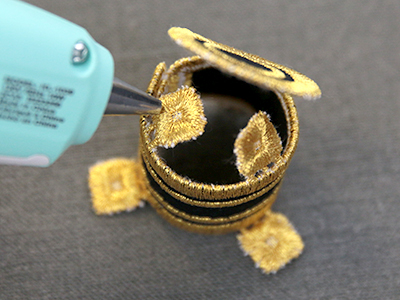
The top of the dome is the open side with the circle piece. Fold both tabs, and the circle in. Then place glue on one of the two tabs.
Glue the tab to the wrong side of the circle piece. Hold until the glue dries. Then repeat to glue the other tab to the wrong side of the circle piece.

Then fold in the three bottom tabs. Place glue on one of them.

Position the dome on top of the boiler ("a"), but this time place it at the edge if the back opening. Make sure the glued seam also faces the back opening. Then repeat to glue the other two tabs onto the boiler. This completes the entire boiler piece. Set it aside for now.
Next take the back cab piece (file "h"). Place glue along the left, long glue tab.
Glue this tab onto the wrong side of the left side piece (file "f"), matching up the edges as shown.
Since these pieces will fold where they meet, leave a small gap between the finishing edges, so you can just barely see the connectors of the glue tab.

Then repeat to glue the right side (file "g") onto the other side of the back cab piece.

Take the top base piece (file "j"), and place glue along one of the long glue tabs. This is a piece where it is much easier to glue the tab in place a little at a time.
Glue the top base piece onto one of the side pieces. Make sure to match up the front corners, and edges of the finishing borders.
Where the base is covered by the inside of the cab, simply glue the tab onto the wrong side of the side piece until you get to the corner. Do not match the tab up with the bottom edge. Instead, try and keep it as level as possible. Again leave a small gap between the pieces where they fold.

Then place glue on the shorter tab that is now by the back cab piece ("h").

Glue the tab onto the wrong side of the back cab piece ("h").
Again do not match the tab up with the bottom edge of the piece. Instead, try and keep the top base piece as level as possible.

Then repeat to place glue on the other long side tab of the top base piece.

Glue the tab onto the opposite side piece. Make sure to match up the finishing border edges and corners.
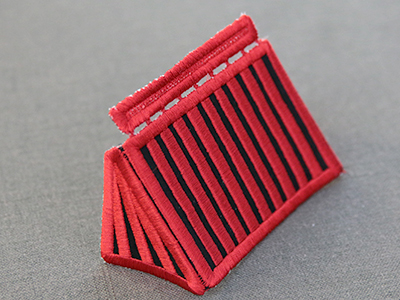
Take the pilot (file "m"), and fold it along the two fabric folds to create the triangle sides that help it stand up on its own.
Place glue on the remaining tab on the top base piece ("j").

Then glue the glue tab of the pilot piece ("m") to the glue tab on the top base piece with right sides together. Make sure to match up the edges.

Take the bottom base piece (file "k"), and fold it along its one fabric fold.

Place glue on the wrong side of the pilot ("m") glue tab that is attached to the top base piece.

Then match up the corners, and glue the wrong side of the pilot tab, onto the wrong side of the bottom base piece. Make sure to leave a small gap for folding.

Place glue along one of the short tabs on the bottom base piece.
Then fold that tab in, so it is against the wrong side of the adjacent side piece. Hold the tab in place until the glue dries.

Then repeat to fold in and glue the opposite small glue tab onto the wrong side of the other side piece.

Next place glue onto one long tab of the bottom base piece ("k").

Match up the corners of the finishing seams on the base piece with the corners of the finishing seam on the adjacent side piece. Glue both ends to the corners first to make sure everything lines up. Then glue the tab to the back side of the wheels as well.
Repeat to glue the other long glue tab of the bottom base piece to the opposite side piece.

Place glue on the bottom tab of the back cab piece ("h").

Tuck it in, and glue the tab onto the wrong side of the bottom base piece ("k").
To secure the sides of the pilot ("m") in place, spread a thin line of glue in the joint of the fold at the front edge of the side piece.

Then press the edge of the pilot's folded side into the joint with the glue. Hold it in place until the glue dries.

Repeat to glue the other side of the pilot to the opposite side piece.

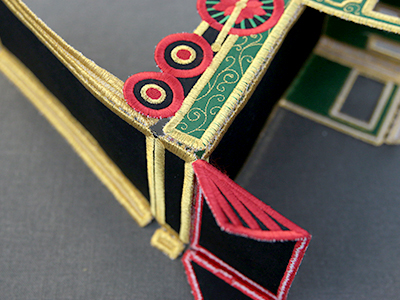
Next take the front cab piece (file "i"), and place glue on the either of the side glue tabs.

Carefully match it up, and glue the tab onto the wrong side of one of the adjacent side piece ("f" or "g"). The bottom of the front cab piece ("i"), should be flush with the top base piece ("j") when the glue tab is folded under.

Then place glue along the bottom glue tab of the front cab piece ("i").

Fold the glue tab under, and tuck it inside. Glue it onto the top base piece, but on the inside of the cab where it will not be seen.

Then repeat to glue the remaining cab front side tab onto the adjacent side piece.
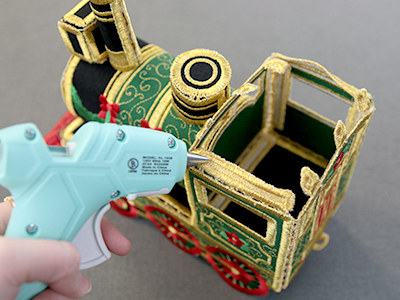
Pick up the boiler which was completed earlier (files "a", "b", "c", "d", & "e"). Place a generous amount of glue all along the bottom glued seam.

Position it on the top base piece ("j"), so the open back is against the front cab piece ("i").

Then place glue on one of the remaining small tabs on the boiler ("a").

Fold it in, and glue it onto the front cab piece. Then repeat for the other two tabs For best results, use your gluing stick to hold the tab in place.
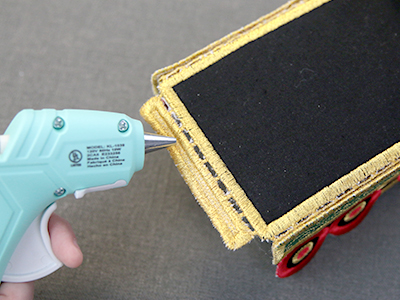
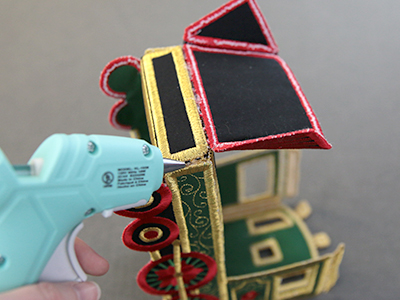
To add the roof, place glue along one of the two longer tabs.

Match up the corners, and glue the tab onto the wrong side of the roof piece ("l"). Leave a small gap for the fold.

Then repeat to glue the other long glue tab to the other short side of the roof piece.

Place glue on the remaining small, glue tabs one by one

One by one, tuck them under the roof, and glue the small tabs onto the wrong side of the roof piece. There are three on each side.
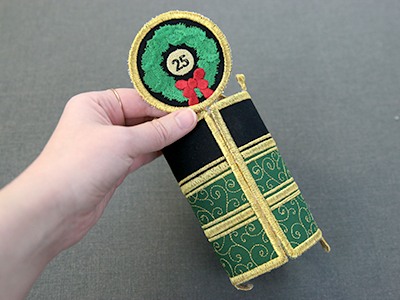
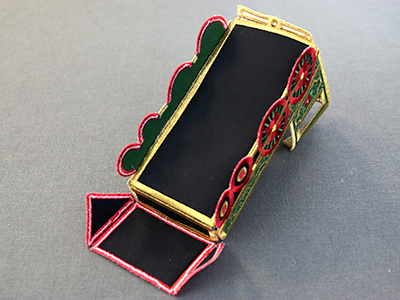
Your train engine is complete! Follow the steps below if you would like to add a smoke puff.

To make smoke for the smoke stack, first cut a pipe cleaner to the correct length. For the large train engine (X15004) cut it to 8" long. For the small train engine (X15005) cut it to 6" long.

Take a chunk of polyester fiberfill larger than your pipe cleaner. Roll and press it together until it is condensed and holding together well.
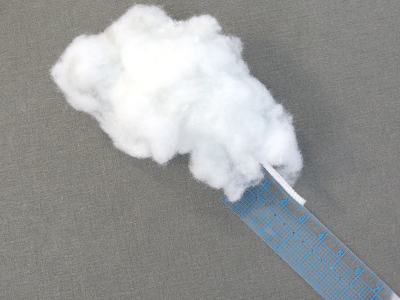
Stab the pipe cleaner through the center of the polyester fiber fill shape, so one end is hidden in the fiberfill and the other end is still sticking out. For the large train engine (X15004) make sure the pipe cleaner sticks out one side 3". For the small train engine (X15005) make sure the pipe cleaner sticks out one side 2"

Then bend the pipe cleaner into an "L" shape where the small end sticking out is the short side of the "L".
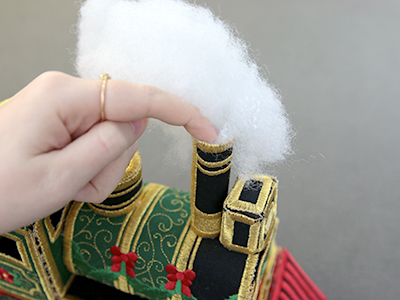
Place the exposed end of the pipe cleaner into the smoke stack. If the pipe cleaner feels loose in the smoke stack (especially on the larger size), stuff the smoke stack with polyester fiberfill until the pipe cleaner can no longer move around.

Then carefully pull away pieces of the polyester fiberfill to shape it into your desired shape.

The train engine comes in two sizes for you to decorate with or give as a gift this holiday season.


