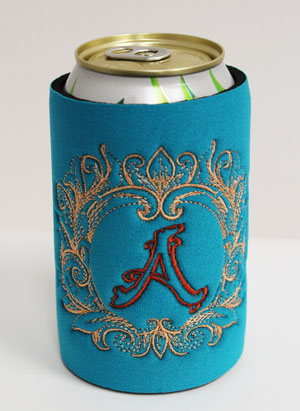
If you remember the '70s, then you remember those big and bulky foam can cozies. Well, they're back and more sleek and stylish than ever before - but now they're called koozies.
These project instructions show how to make a very simple can koozie out of a rectangular piece of neoprene.
Special note: Neoprene can be hard to find -- I had to special order mine online. You may find it easier to order a blank and unconstructed can koozie. I ordered several from The Sewphisticated Stitcher (great variety, always great service).
Supplies
Supplies Needed:
**10" wide by 6" high piece of neoprene (I recommend a 2mm or 3mm thickness)
**Medium weight cutaway stabilizer
**Temporary spray adhesive
**Air-erase pen
**Measuring tape
**Fabric glue (optional)
Designs Used:
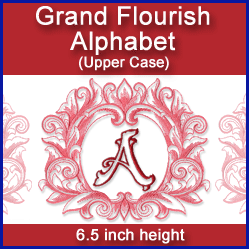
In this project I used a letter from the Grand Flourish Alphabet Design Pack (3 1/4 Inch Height). However, you can use any design on neoprene; this thick and rubbery fabric supports designs of any style and complexity.
Special Project Note:
I wasn't able to find neoprene at any of our local fabric stores, so I ordered it online from Seattle Fabrics. It arrived quickly, and as promised. It may be cheaper to order blanks from The Sewphisticated Stitcher (unless you happen to have an old wet suit lying around).
Designs Used
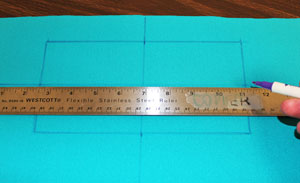
First measure a soda can for your koozie. I sized mine for a standard aluminum can (Diet Mountain Dew). Measure the circumference and add 1/2 inch.
Measure the height of the can - just the straight up-and-down part, don't measure the part where it tapers in at the top and bottom.
My can measured 4 1/4 inches tall. The final measurements are width: 8 3/4 inches wide; height: 4 1/4 inches tall.
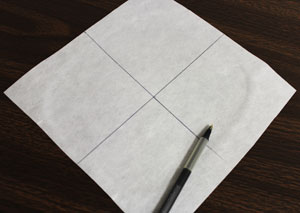
Using an air-erase pen, draw a rectangle with these dimensions on the neoprene.
Then, measure and mark the center of each side by measuring and dividing by two. Draw lines connecting the marks; where the lines meet is the center of the shape.
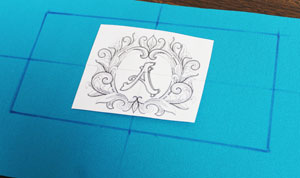
Create a paper template of the design by printing it at full size from an embroidery program. Poke a hole in the center of the template and align it with the center point on the neoprene. Make sure the design fits well within the shape; there should be at least 1/2" of space between the outer top and bottom edges of the design and the top and bottom edges of the shape. Also, there should be at least one inch of space between the outer side edges of the design and the side edges of the shape.
Since neoprene is rubbery and slippery, it can't be easily hooped. The top hoop would most likely pop off during the embroidering process even if it stays in place initially. Because of this, I will "float" the neoprene on top of the stabilizer.
Cut a piece of medium weight cutaway stabilizer a bit larger than your hoop. With a pen, draw crosshairs on the stabilizer (with the center point in the middle of the stabilizer).
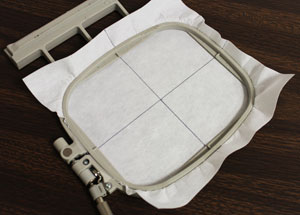
Hoop the stabilizer by aligning the marks on the hoop with the lines on the stabilizer. Spray the stabilizer with temporary adhesive.
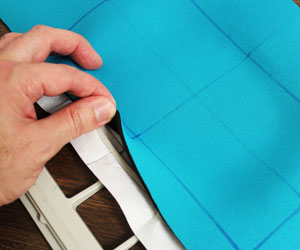
Align the lines on the neoprene with the lines on the stabilizer and smooth in place.
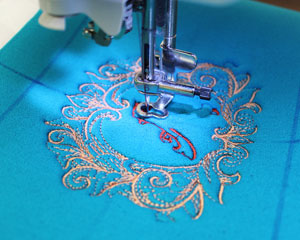
Attach the hoop to the machine and load the design. Move the hoop so that the needle is directly over the center point on the fabric and embroider the design.
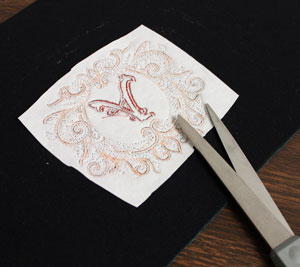
When the design has finished, trim away the excess stabilizer on the backside of the embroidery.
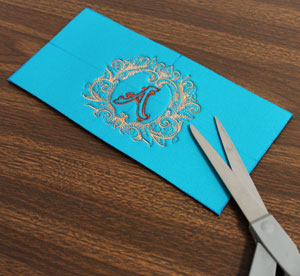
Then, cut out the shape.
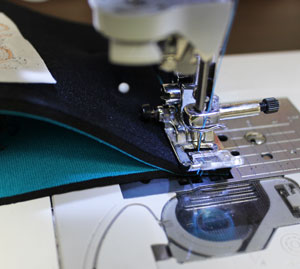
Fold the shape, right sides together, and align the short ends together. Pin in place and sew a 1/4" seam along the pinned edge only.
Sometimes the double layer of neoprene gets too thick for the machine to properly form a stitch. If this occurs, you can try slowing your machine down to its lowest setting. Or, glue the seam by simply adding fabric glue along one short end, align the short ends together, and press in place.
You can use black binder clips to hold the neoprene together as the glue dries. Then, turn the koozie right side out and you are done!

You'll be the hit of the beach party or outdoor cookout with a koozie that is handmade and personalized with beautiful embroidery, too!


