Craft soaring style with these unique shoe wings! Just stitch each design in-the-hoop, then add metal grommets and lace onto shoes for a playful accent that all ages will love. We'll show you how!
Supplies
Project Needs & Notes:
- 1/4 yard of flannel or quilter's cotton
- Tear away stabilizer
- Temporary spray adhesive (such as Gunold KK100)
- 1/4" 2-part grommets
- Craft knife
- Cutting mat
- Lace up shoes
Design featured in this tutorial is:
- X14260, Shoe Wings - Monarch (In-the-Hoop)
Designs Used

This in-the-hoop design has six files. Two are full embroidery file. The other two are dieline files, marked with the letters DL. Dielines are used to cut the fabric to the right shape and size.
Open the dieline files with embroidery software and print them. If you do not have embroidery software, Wilcom TrueSizer is a free program to use.

Spray the back of the paper dielines for the right wing (file "a") with temporary adhesive, and smooth them onto the right side of the fabric.

Then carefully cut out both shapes, and remove the paper dielines.

Now that the fabric pieces are ready, hoop a piece of tear-away stabilizer tightly. Madeira E-Zee Tear 1.5 oz. or Floriani Tearaway Medium are good choices. Those brands are more fibrous, less paper-like, and will tear more cleanly.

Attach the hoop onto the machine and load the embroidery file (not a dieline file).
Use a 11 (or 75/11) sharp sewing needle instead of an embroidery needle. A sharp sewing needle has a smaller, finer point than an embroidery needle, so it will make smaller perforations in the stabilizer.
Embroider the design. The first thing to embroider will be the dieline or outline of the fabric shape. This marks the area on the stabilizer for the fabric pieces.

Remove the hoop from the machine, but do not unhoop the stabilizer. Spray the backside of the front fabric piece with temporary adhesive, and place the fabric right inside the sewn outline.

Attach the hoop back onto the machine, and continue to embroider the design. The "front piece tackdown" step will sew first, adhering the fabric to the stabilizer.

Stop the machine before sewing the "back piece tackdown" step. Take the hoop off the machine, but do not unhoop it. Spray the back fabric piece with temporary adhesive, and place it inside the shape over the back side of the embroidery.

As all the embroidery will be seen on both sides of the design. Wind a bobbin to match every thread color used in the rest of the design.

Place the hoop back onto the machine, and embroider the "back piece tackdown". This will bind all the layers of fabric and stabilizer together. Then continue to embroider all the inner details.
Make sure to change out the bobbin at every color step, so it always matches the top thread.

Once the embroidery is finished, unhoop it, and tear away all the excess stabilizer from around the design. The dieline stitches will also be removed with the stabilizer.

Then use a craft knife to cut a small "x" shaped hole where the grommet goes on the tag.

Follow the manufacturer's instructions, and add the grommets onto the tag.
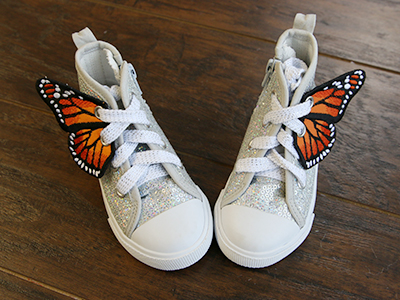
Then repeat the previous steps to embroider and add the grommets onto the left wing (file "b"). Attach the wings by lacing the shoes through the grommets on the wings as well as the shoes.

To have two wings on each shoe, simply embroider another pair of wings (both files a & b) following the instructions above.
