Welcome spring into your home with colorful new placemats.
Use the classic double pinwheel quilt block, paired with your favorite embroidery designs to create a perfect springtime project.
Read below for these free project instructions and get started today!
April's spring pinwheel placemat is the fourth installment of the Placemat of the Month series. Check back the first Wednesday of each month and you'll find a new placemat project, absolutely free for your use! Each project will demonstrate how to combine your love of embroidery with classic quilting methods.
Have you missed an installment? Links are below!
January - Snowball Block Placemat
February - Lots of Love Placemat
March - Patchwork Placemat & Patchwork Table Runner
May - Sunflower Fiesta Placemat
June - Summertime Trapunto Placemat & Summertime Trapunto Table Runner
July - Crafty Cravings Placemat
August - Puppy Love Placemat
September - Autumn Abundance Placemat & Autumn Abundance Table Runner
October - Sumi-e Embroidered Placemat
November - Give Thanks Pocket Placemat
December - Rudolph's Run Placemat & Rudolph's Run Table Runner
Supplies
Supplies Needed:
**1/2 yard solid-colored quilter's cotton (for borders and back)
**Assorted fat quarters (we used 8 total) for embroidered and pieced blocks - three solid color and five prints
**Batting or extra-loft batting
**Medium-weight or lightweight cutaway stabilizer (we used Floriani No-Show Mesh)
Supplies Continued:
**Temporary spray adhesive
**Air-erase pen (or other marking tool)
**Straight edge
**Quilting cutting mat
**Rotary cutter
**Nylon monofilament thread
**Needle and thread for some hand sewing
**Hand embroidery floss or thick craft thread and large needle (for French knot ties)
**Ruler
Designs used:
Scarlet Tanager (Toile) - Large
Goldfinch (Toile) - Large
Robin (Toile) - Large
These designs are also available in design packs:
A Toile Backyard Birds Design Pack - Large, Small
Add a touch of spring to your placemat! Any of the following designs would also make great design choices: Signs of Spring Redwork, Vintage Feathered Friends, and Magical Mariposa.
Finished Size:
21 1/2 inches wide by 15 inches high
Designs Used

To begin, we will prepare the fabric for the embroidered blocks. On the solid colored fabric, using an air-erase pen (or other marking tool), draw a 7 inch by 7 inch square - leave a couple of inches of excess fabric around the shape. Measure and mark the center of each side of the square by measuring and dividing by two.

Draw lines to connect the marks, creating a diamond shape within the square.

Then, draw lines across the shape, connecting the marks - where the lines meet is the exact center of the shape.

Create a paper template of the design by printing it at full size using embroidery software. If you don't have embroidery software, you can cut a piece of paper the shape and dimensions of the design to help with placement and centering. If you'd like a recommendation for an embroidery program that can make templates, consider Embird from www.Embird.com.
Poke a hole in the center of the template and align it with the center point on the fabric. Make sure the design fits well within the shape - there should be at least 1/4 inch of space between the edges of the design and the edges of the diamond shape.

Spray a piece of medium-weight or light-weight cutaway stabilizer (we used Floriani No-Show Mesh) with temporary adhesive and smooth the fabric on top. Hoop the fabric and stabilizer together by aligning the marks on the hoop with the lines on the fabric. Attach the hoop to the machine and load the first design. Move the hoop so that the needle is aligned with the center point on the fabric.

Embroider the design

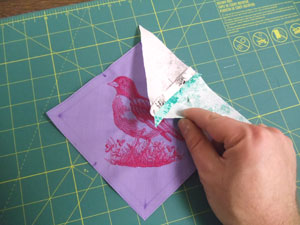
When the design has finished, measure and mark out 1/4 inch around the entire outer edge of the diamond shape. Draw lines connecting the marks, then cut out the shape. Repeat the fabric marking, hooping, embroidering, and cutting process for each embroidered block (we are embroidering three blocks).

To prepare the fabric for the corners of the embroidered blocks, cut a total of four 3 3/4 inch by 3 3/4 inch squares (we cut two of one print and two of another print). Using a straight edge, cut the squares in half diagonally, creating eight triangle pieces.

Align the triangle pieces together with right sides facing, pairing the different prints. Be sure to stack the pieces together the same way as they will be repeated around the block, creating the pinwheel pattern. Pin the pieces together and sew a 1/4 inch seam along the vertical right edge.

Press the back seam open with an iron.
Repeat this process with each triangle piece, creating four paired pieces. Then, measure and mark the center of each side edge of the embroidered piece. With the right sides facing, align the center seams of the triangle pieces with the center marks on the embroidered piece.
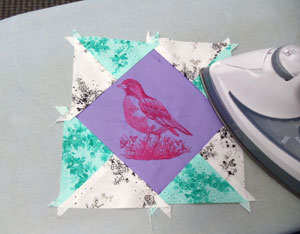
Pin in place and sew a 1/4 inch seam along the outer edges. Press the seams and trim off the excess fabric at the sides and corners.
Repeat this process of creating the corner pieces for each of the embroidered blocks.

To prepare the fabric for the solid piece blocks, cut two squares 4 1/2 inches wide by 4 1/2 inches tall. Using a straight edge, cut the squares in half diagonally creating four triangle pieces (we used solid colored fabric for these pieces).

Cut four squares 3 3/4 inches by 3 3/4 inches - two each of two separate prints. Cut the squares in half diagonally creating eight triangle pieces. Pair up the print triangle pieces as you did previously (with right sides facing), again be sure to stack them the same way. Sew a 1/4 inch seam along the vertical right edge and press the seams.

Align the large solid colored triangle pieces on top of the paired print pieces with the right sides facing. Pin in place and sew a 1/4 inch seam along the long edge only. Press the seams.
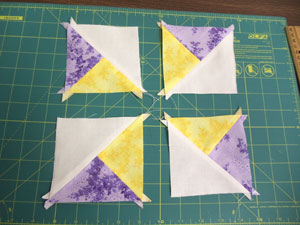
Arrange the four small assembled blocks together as shown.

Trim the excess fabric at the corners and align the top blocks together and the bottom blocks together (left side over right side). With left edges together, align the seams, and pin in place. Sew a 1/4 inch seam along the right edges only and press.
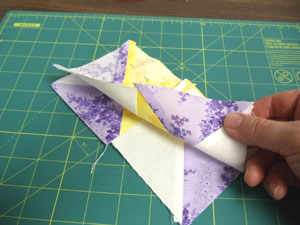
Place the assembled top blocks on top of the assembled bottom blocks with right sides facing. Align the seams and sew a 1/4 inch seam along the right edge only. Press the seams.
Repeat the cutting, arranging, and sewing process to create three pieced blocks.

Now that all of the blocks are assembled, it is time to assemble the front panel. Arrange the blocks how you want them.
Align the top left block with the bottom left block with right sides facing. Align the seams and pin in place along the top edge. Sew a 1/4 inch seam along the pinned edge only and press the seams.

Repeat this process with the top and bottom center blocks and the top and bottom right blocks.

Lay the center blocks flat and place the left blocks on top with the right sides facing. Align the seams and pin in place along the left edge. Sew a 1/4 inch seam along the pinned edge only. Press the seams.

Place the right blocks on top of the center blocks with right sides facing. Align the seams, pin in place along the right edge, sew a 1/4 inch seam along the pinned edge, and press.

To prepare the fabric for the side borders, cut two pieces of fabric 1 1/2 inches wide by 14 1/2 inches high. With the right sides facing, align the side pieces with the side edges of the assembled front panel. Pin in place, sew a 1/4 inch seam along the pinned edges, and press the seams.

To prepare the fabric for the top and bottom borders, cut two pieces of fabric 22 3/4 inches wide by 1 1/2 inches high. With the right sides facing, align the top and bottom pieces with the top and bottom edges of the assembled front panel. Pin, and sew a 1/4 inch seam along the pinned edges. Press the seams.

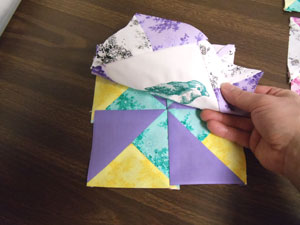
To prepare the fabric for the back of the placemat, lay the assembled front panel on top of the fabric, pin, and cut out the shape. Also, cut a piece of the batting just as you did for the back. Lay the back fabric flat with the right side facing up. Place the front panel on top with right sides facing. Align the batting piece on top of the front panel and pin all the layers in place. Sew a 1/4 inch seam along the top, bottom, and one side edge - leave the other side edge open for turning.

Turn the placemat right side out between the front and back panels (the batting will end up inside the placemat), and press the seams. Also, turn the fabric of the opening in 1/4 inch and press.

Hand-sew the opening closed by stitching with needle and thread.
With nylon monofilament in the needle and matching thread in the bobbin (thread that matches the back fabric) quilt through all the layers by stitching along the existing seams around the inner edge of the border.

We used French knot "ties" to finish the inner portion of our placemat. We placed a knot at corners and sides of each block. To do this, thread a large needle with hand embroidery floss or thick craft thread. Tie a knot at the end of the thread and start by stitching from the back to the front.
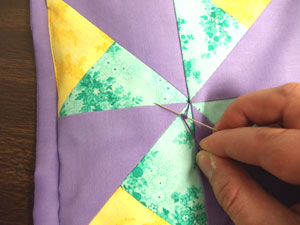
Wrap the thread around the needle about four times, holding the needle in one hand and pulling the thread tight with the other hand. Stitch from top to bottom at the same point you started at and pull the thread tight. Tie off the thread at the back with a knot, and your placemat is complete!

Stitch an entire table setting to celebrate the arrival of spring. It'll give your home the kind of bright beauty that can only be handcrafted.


